|
Hey everyone! I hope your week is going great and you are getting some crafting in! Today I am showcasing the Happy Hippos stamp set from My Favorite Things and I have to say - these hippos are so darn cute! I love them! I used the Slimline Pillows Die from Whimsy Stamps for this card which is perfect to set the scene! I used Party Dress, Do-Si-Do, Black Jack, Twilight and Sand Castle inks from Catherine Pooler for the negative spaces of the slimline die. I then stamped the cakes and hippos with Hero Arts Intense Black ink and cut them out with the coordinating dies and then colored them with COPIC colors RV29, RV25, RV23, RV21, W7, W5, W3 and W1.I then popped them onto the negative spaces with foam tape and then popped the negative spaces in their spots with foam tape. I then stamped the sentiment and popped it with foam tape. I then glued the card panel onto a pink card panel using Bearly Art glue and then glued it onto a 110lb black card base. I then finished the card with some bling from Queen & Co that I had in my stash. I love how this card came out! I hope you all have a great rest of the week and I will see you this weekend! Happy Crafting Y'all! 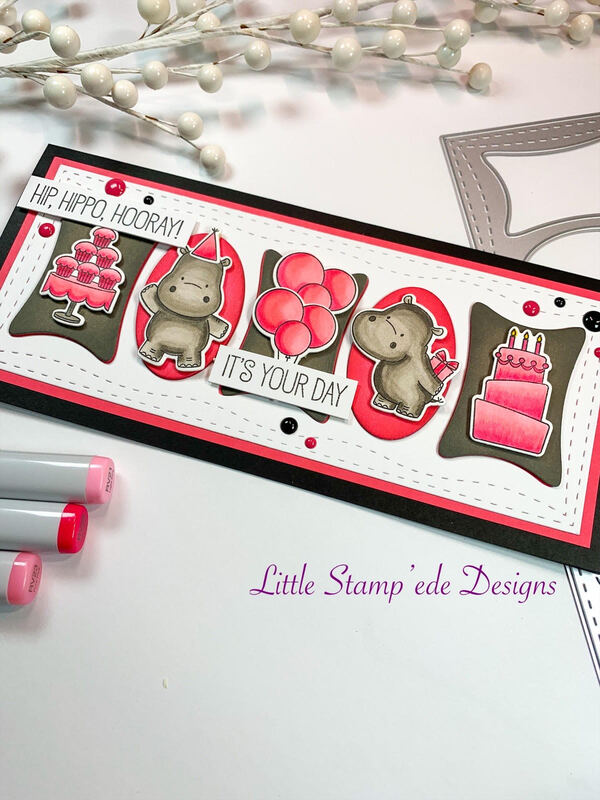 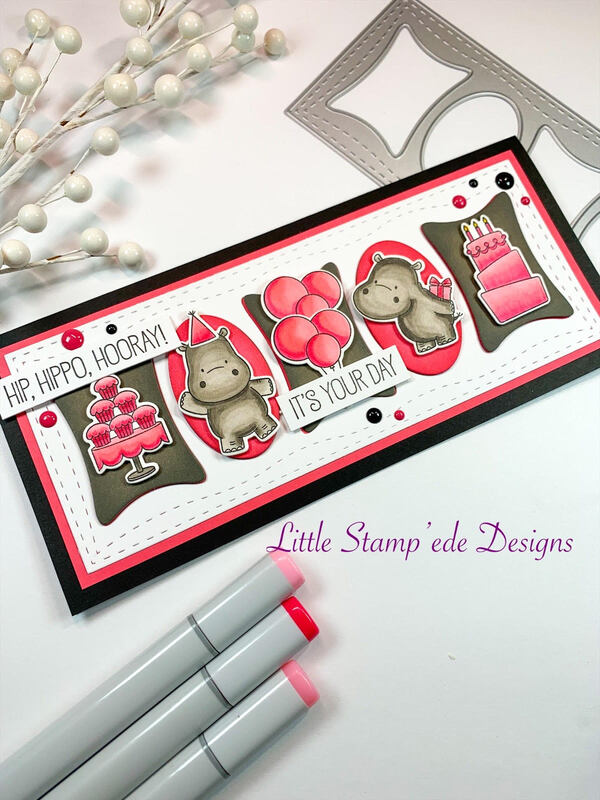 Happy Monday everyone!! On Saturday, the Love Wins Instagram Hop began to celebrate Pride Month and it lasts until June 17th! I am on Team Yellow and today is our day to celebrate! I am so exited to be participating in this hop and it means so much to me! I hope you will go hop along with us! There are SO MANY prizes!! For this card, I used the Rainbow Builder from the Slimline Series from Trinity Stamps along with the Cloud stencil and Love You Bunches stamp set and die. First I cut out the rainbow and corner clouds with the Rainbow Builder dies and colored the rainbow using blending brushes and Distress Oxide colors Wilted Violet, Mermaid Lagoon, Lucky Clover, Mustard Seed, Kitsch Flamingo, Festive Berries and Spiced Marmalade. I then added some Glossy Accents to add that extra shine. Using the cloud stencil, I made colorful clouds for the background using the same colors and added some cloud color the the corner clouds cut out from the Rainbow Builder. I then stamped the Love You bunches floral image with Hero Arts Intense Black ink and fussy cut out the main floral image and then stamped the smaller flower images and die cut them out with the coordinating dies. I then colored them with Copic colors Y19, Y06, Y02, YR09, YR04, YR02, YG67, YG25, YG01, B39, B37, B34, B21, R59, R46, R24, V09, V06 and V04. I then used some rain drop dies from Catherine Pooler and made shaker rain drops using some Rainbow Shaker Mix from Paper Rose. This card came together beautifully! I know it has a lot going on, but that is what I wanted! I love it! I used Bearly Art glue to glue it all together and popped it onto a 110lb white card base. I hope you all hop along with us on Instagram for your chance to wine some GREAT prizes! See you all later this week! Happy Crafting Y'all! 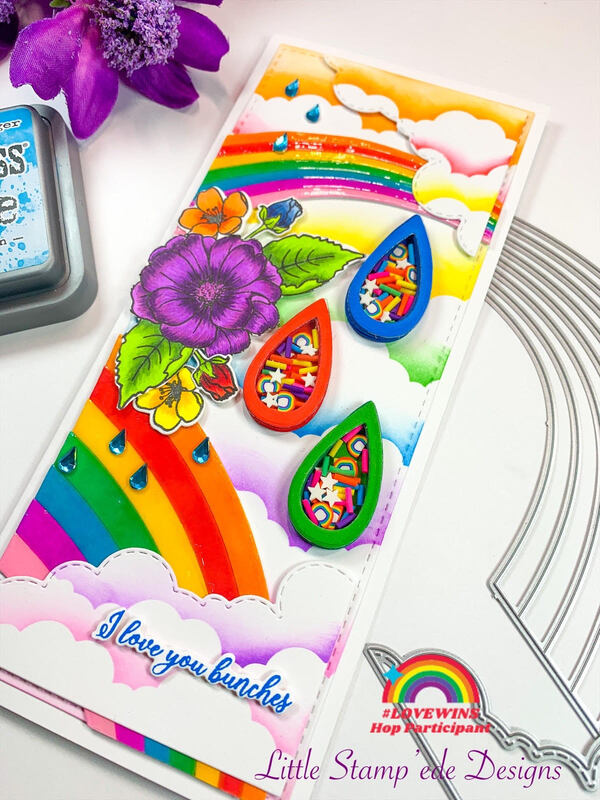 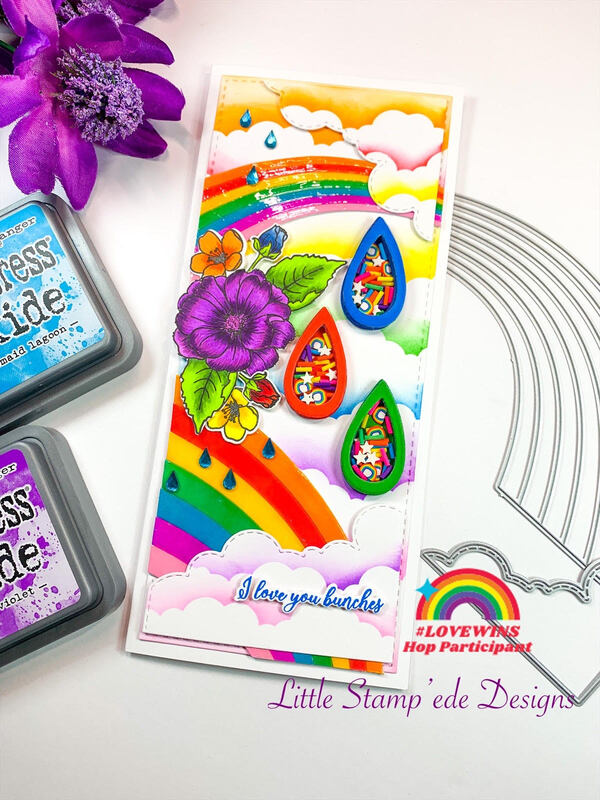 Hey everyone!! I hope you all are having a great weekend! For today's card, I played with the stamp set from Crafty Meraki called Believe In Miracles, illustrated by Emily Midgett. I just love her illustations! They are so beautiful!! First, I stamped the image with Hero Arts Intense Black ink and then colored it with Copic Markers YR09, YR16, Y17, Y15, YG67, YG03, and G07. I then stamped the sentiment with the same black ink and then popped it up on a prepared black 110lb card base with foam tape and added some black bling that I had in my stash. I love how bright this came out! I hope you all have a great weekend and I will see you all on Monday when I am on the Love Wins IG hop! Come check it out! 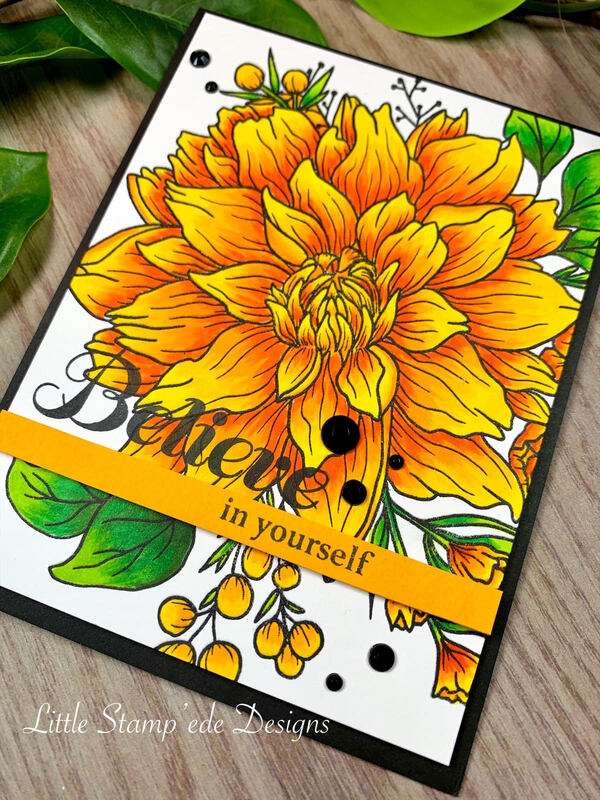 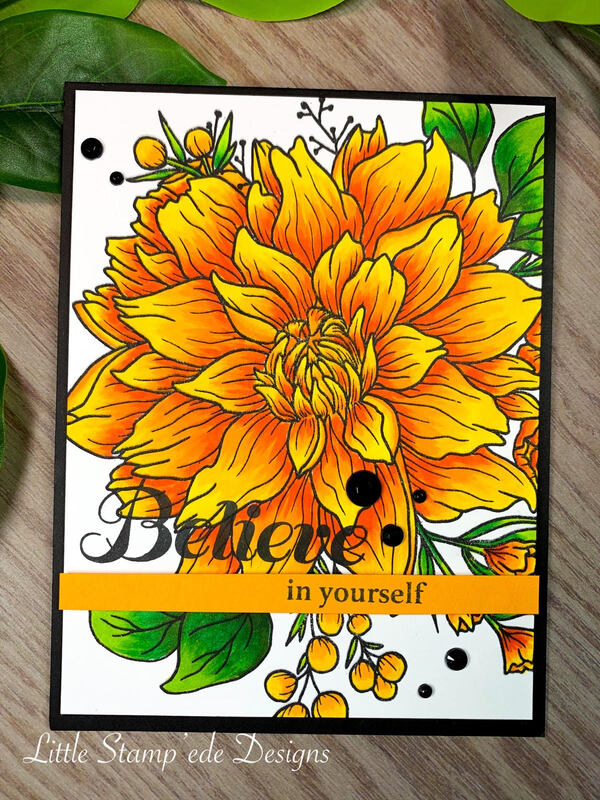 Hey everyone!! The moment I seen that little duck in the Pond Pampering stamp set from Colorado Craft Company, I knew I just had to have it! I love this duck so much! Isn't he just the cutest!! I have been wanting to make a mini slimline card, so I decided to make one with this little guy. I first cut out three different layers using the deckled mini slimline dies from Kat Scrappiness. I then ink blended the bigger and smaller layer with Catching Rays ink from Catherine Pooler. I then edged the layers with Sauna and Icing on the Cake inks to create a distressed look. I then took the middle layer and embossed it with the Dainty Diamonds embossing folder from Stampin Up. I then inked up the duck, two flowers and the butterfly using Hero Arts Intense Ink and cut them out with the coordinating dies. I then colored them using COPIC colors YR23, Y18, Y08, Y04, YR07, YR04, YG67, YG03, G07 and R46. I then glued the layers together using Bearly Art glue and popped the duck, the flowers and the butterfly using foam tape. I then glued the card panel onto a 110lb white card base. I finished the card with some crystal bling I bought on Amazon. I really like how this card came out and I LOVE this ducky! I hope you all have a great rest of the week and I will see you all this weekend with another creation! Happy Crafting Y'all! 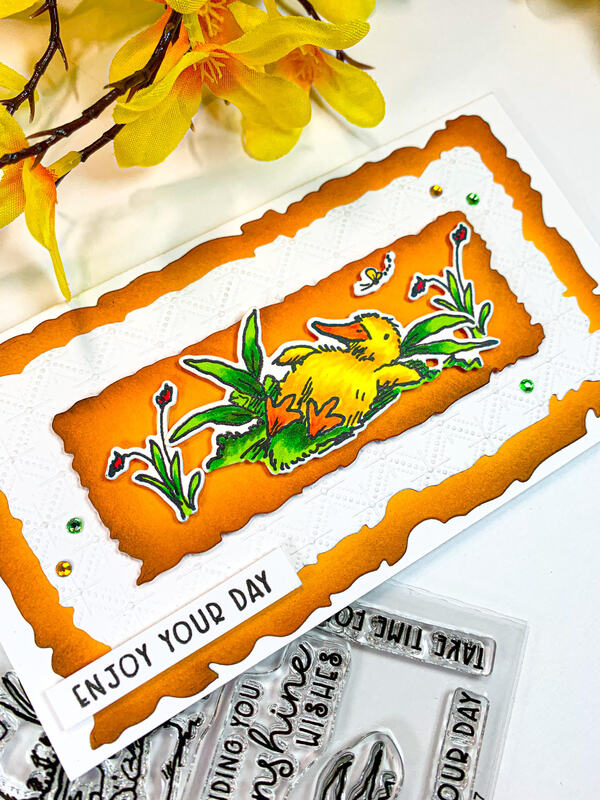 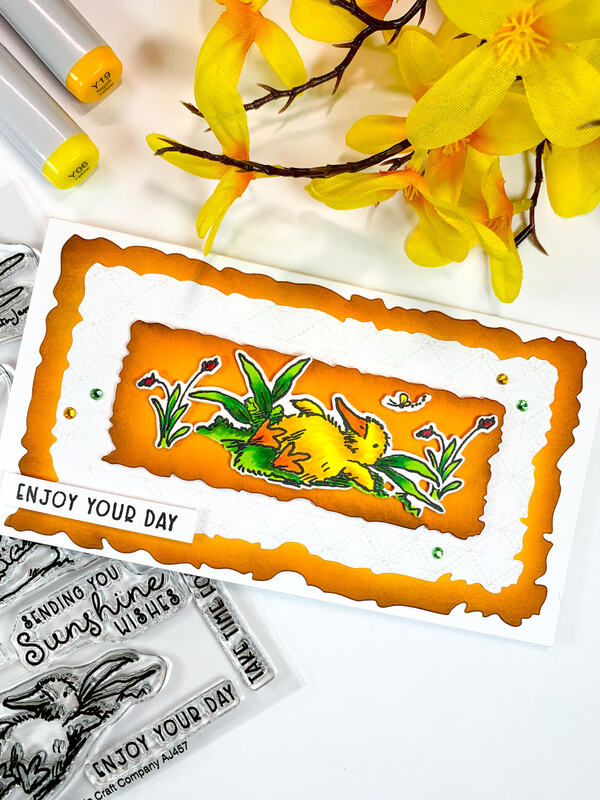 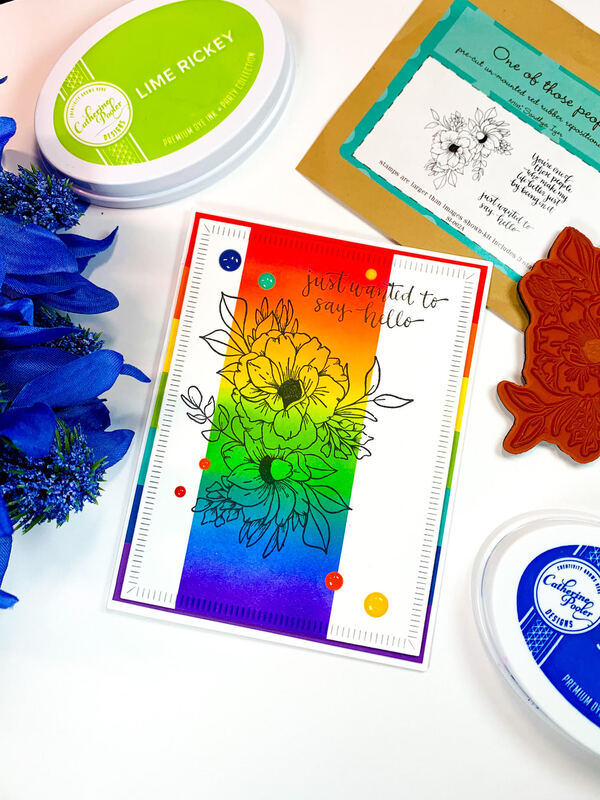 Hey everyone!! It is Tuesday, and it has already been a long week! LOL! As most of you know, I LOVE to color with my COPIC markers. When using COPIC markers, you must use a special kind of paper so that the colors will blend and react the way you want them to react. Well....I had stamped this beautiful floral image from the One of Those People stamp set from Unity Stamp Co with the intent to color it with COPIC markers, come to realize after I stamped the image, I stamped it on the wrong kind of paper! So, after I realized that, I put the card panel into my "I will deal with it later" pile and re-stamped it on the "right" paper. Move forward a couple of months, I went to my "I will deal with it later" pile and decided to make something of my mistake. After some thought, I decided to make a rainbow card by ink blending. Since the image was already stamped with black Memento ink, I then used some Mint Tape from Scrapbook.com and taped the section I wanted to ink blend so I would have a nice clean line on both sides. I then did some ink blending using the colors Rockin' Red, Orange Twist, Tiara, Lime Rickey, All That Jazz, Suede Shoes and Grape Crush inks from Catherine Pooler. I added a lot of ink so that the colors would pop! I then used a die from the Greetery to add some dimension to my card panel. I wanted to mat the card panel with some color, so I got some colored cardstock in my scraps pile and cut them in strips and glued them together to make a rainbow background using Bearly Art glue. I then popped the card panel onto a 110lb white card base using foam tape. I love a nice clean, bright card and this delivered! I hope you all have a great week and I will see you all in a few days! Happy Crafting Y'all!! 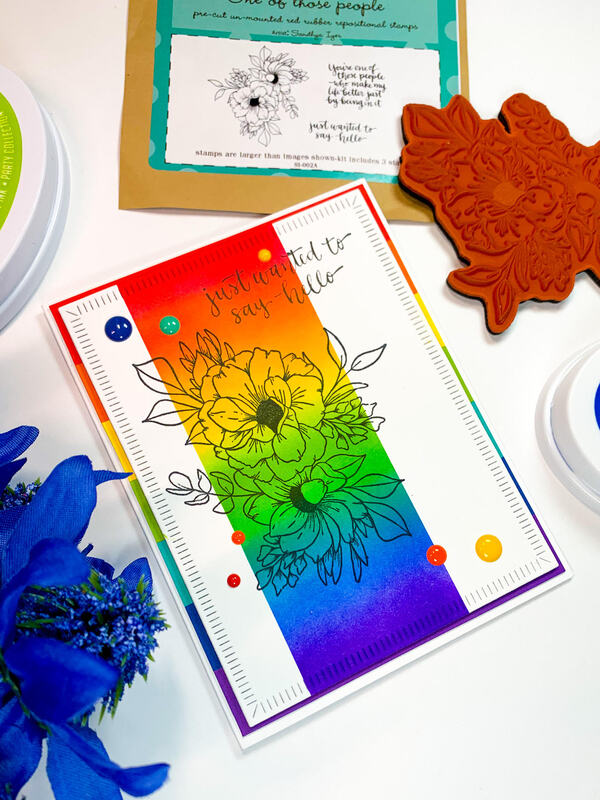 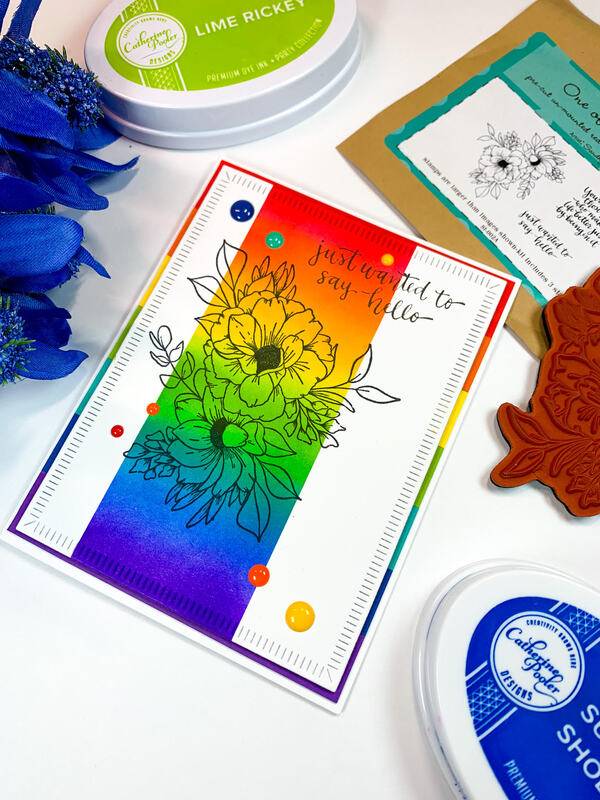 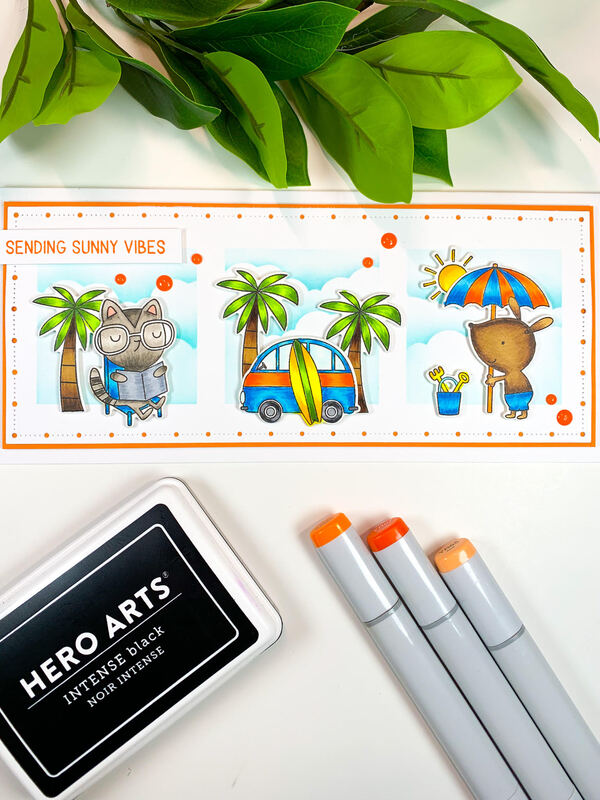 Hey everyone! I hope you all are having a great weekend! Summer is here in Northern Cali, so it has been pretty hot here! With that in mind, it makes me want to go to the beach, so I wanted to make a beachy themed card. I decided to play with the stamp set Sunny Vibes from My Favorite Things. This is such a cute stamp set! First, I used the Alignment Slimline Stencil to make three cloud backgrounds using Cummerbund ink from Catherine Pooler and a blending brush onto a card panel I cut using a slimline die from Gina Marie Designs. I then stamped the images with Hero Arts Intense Black ink onto 110lb Neenah Solar White cardstock and cut them out with the coordinating die cuts. I then colored the images using Copic colors YG67, YG25, YG01, E59, E57, E55. B06, B04, B01, B000, W7, W5, W3, W1, N8, N5, N3, C5, C3, YR65, YR16, YR07, Y19, Y06, Y02, and R21. I then picked the sentiment from the same stamp set and stamped it with Orange Twist ink from Cather Pooler. I then popped up the images and sentiment with foam tape and added some orange enamel dots I had in my stash from Eyelet Outlet. I then used some orange cardstock I had in my stash to made the card panel and then glued it onto a 110lb white card base using Bearly Art glue. This card is so cute!! It looks so bright and sunny!! I hope you all have a great day and I will see you all later this week! Happy Crafting Y'all! 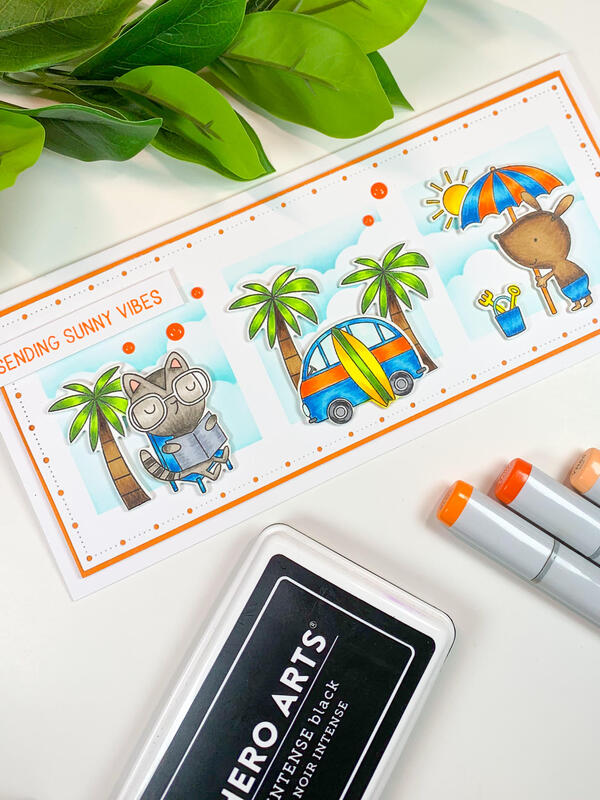 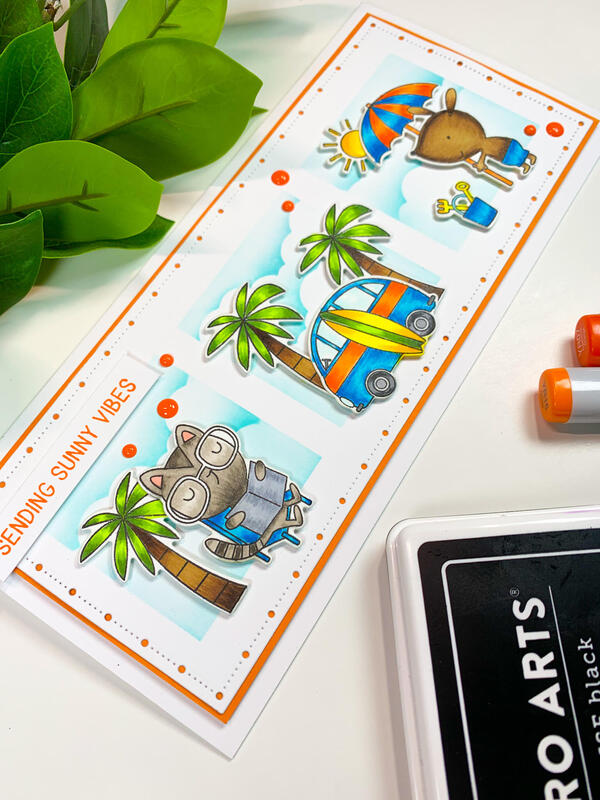 Hey everyone!! I hope your week is going great and tomorrow is Friday! Yay! I have recently discovered a newer company, Crafty Meraki, and I have to say I LOVE her stamp images! First, florals! YAY! You all know I love florals! She also has some very cute stamps that I need to try as well!! She is celebrating her 1 year anniversary, so you should go check her out! For today's card, I went with no-line coloring because this flower just screamed no-line coloring! The name of the stamp set is Love Forever and the artist for this image is Emily which she is an amazing designer! I follow her on Instagram and she is amazing! #Goals So first, I stamped the image with Ink On 3 Fade Out ink and then started coloring with Copic markers, first the black center, and then one petal of the flowers at time. The Copic colors I used for this card are N9, B39, B37, B34, B21, V17, V15, V04, YG67, YG17, YG25, and YG01. After I finished the flowers, I colored the leaves and then the smaller flower images. I then stamped the Miss You sentiment from the same stamp set using Hero Arts Intense Black ink. I glued the card panel onto a dark blue card base and then added some shimmer enamel dots that I had in my stash from Eyelet Outlet. I am very happy with the way this card came out! No-line coloring is very time consuming but so worth it! A little tip: while no-line coloring, use the image outline on the plastic covering that the package comes with as your guide so you do not loose your way while coloring. This helps me a lot! I hope you all have a great day and I will see you all this weekend! Happy Crafting Y'all! 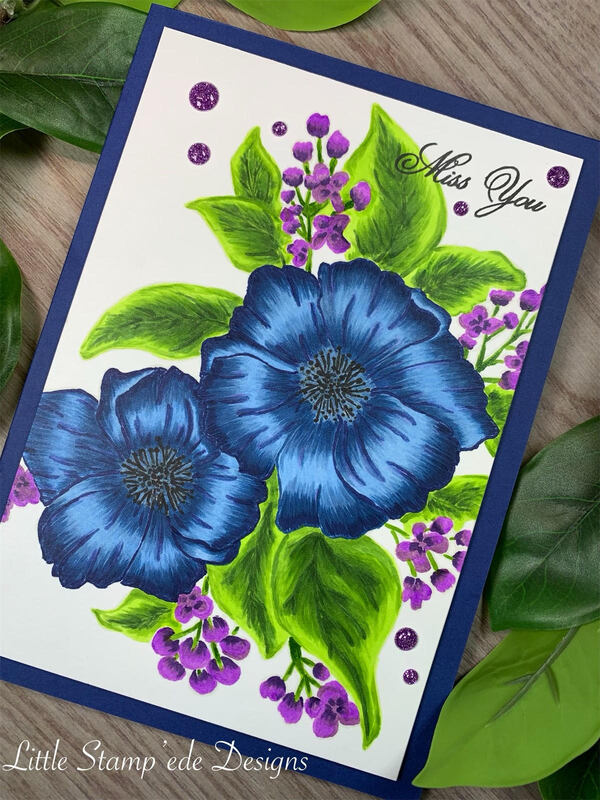 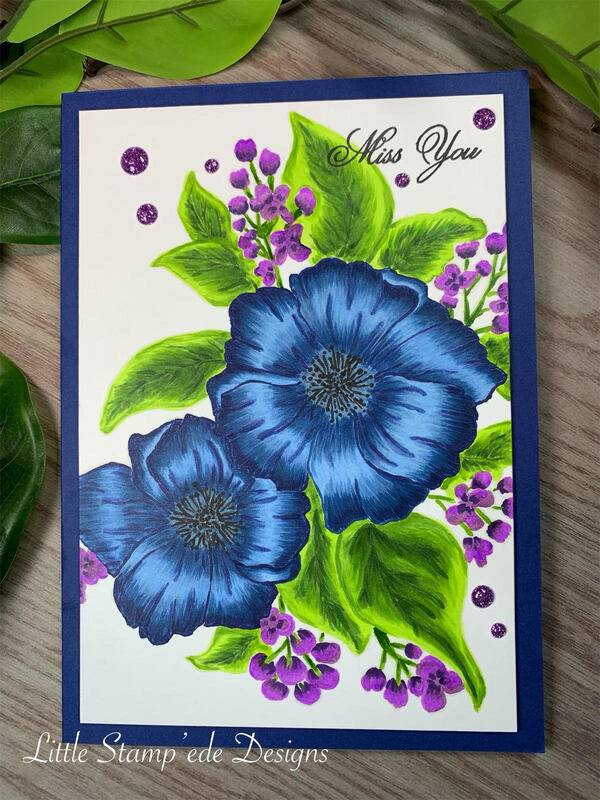 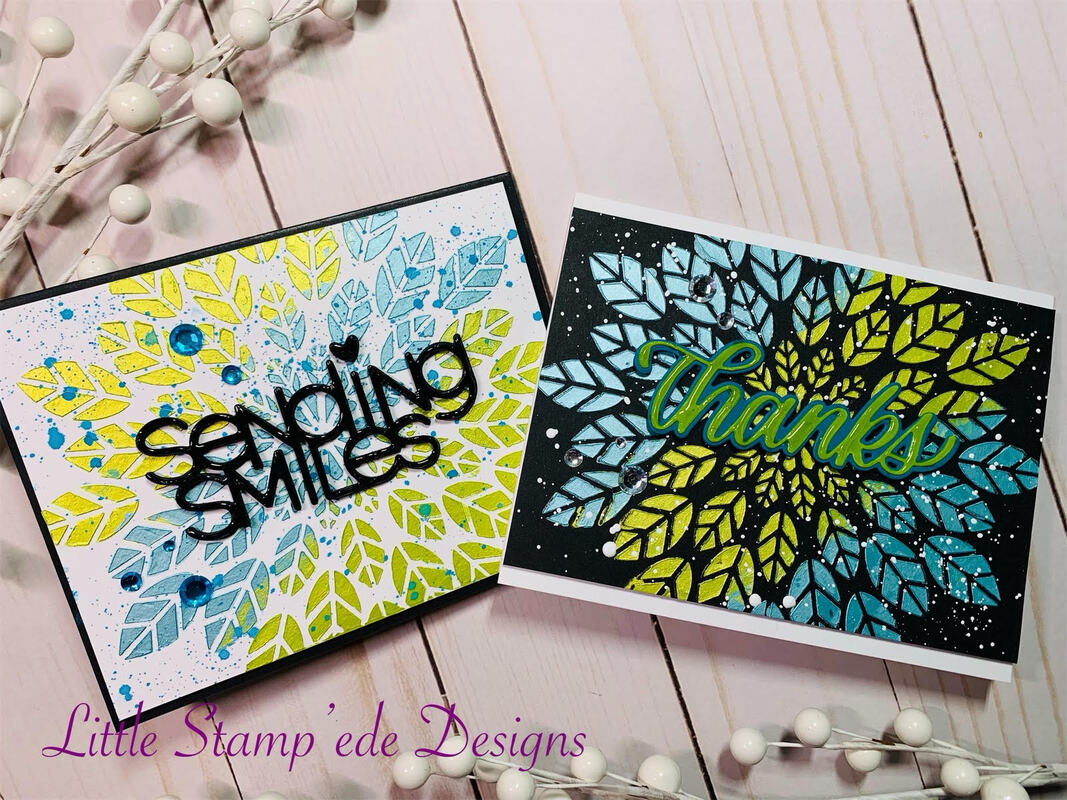 Happy Monday everyone!! It is the first day of June and summer is here in Northern Cali! I spent the long weekend at Craft Camp and I loved it! Can't wait to show you all what I created! For today's card, I used the Leaf Burst stencil from Altenew, which I love! I made a fall card last fall, and I wanted to make a bright colored card this time. I love working with stencils! First, I wanted to make two cards, one with a white background and one with a black background to show off the Nuvo Embellishment Mousse that I bought from Catherine Pooler. If you have not used Nuvo Embellishment Mousse yet, you need to! It is so velvety and glides onto a stencil like butter! So I cut a piece of white 110lb cardstock and a piece of 110lb black cardstock for my card panels. When you are deciding your card panel size, I always try to envision the space needed for my design. I also love the look of extending the card panel to end of the card base like I did with the black card. I then took my Leaf Burst stencil and taped it down using Mint Tape from Scrapbook.com. Using a art spatula, I applied the Nuvo Embellishment Mousse alternating between Citrus Green and Coastal Surf. I then lifted my stencil in the up direction to be careful not to disturb the stenciled mouse since it is still wet and can move. I then got out my Sending Smiles and Thanks sentiment dies from Simon Says Stamp and die cut the image in card stock and also fun foam. I then glued the card stock onto the fun foam using Bearly Art glue and then I applied Glossy Accents to give the sentiments some shine and dimension. After the mousse dried, I wanted to add some splatter so I added white splatter to the black card using Dr. Ph. Martin's Bleed Proof White and added blue splatter to the white card using Tim Holtz Oxide Distress spray Mermaid Lagoon. After that dried, I added the sentiments to the middle of the card panel and added some bling that I had in my stash. I then popped the card panels onto a card base using foam tap. I love how easy it is to use stencils and the possibilities with the mediums to use! The mousse adds dimension which I love! I hope you all have a great week and I will check in with you later this week!! Happy Crafting Y'all!! 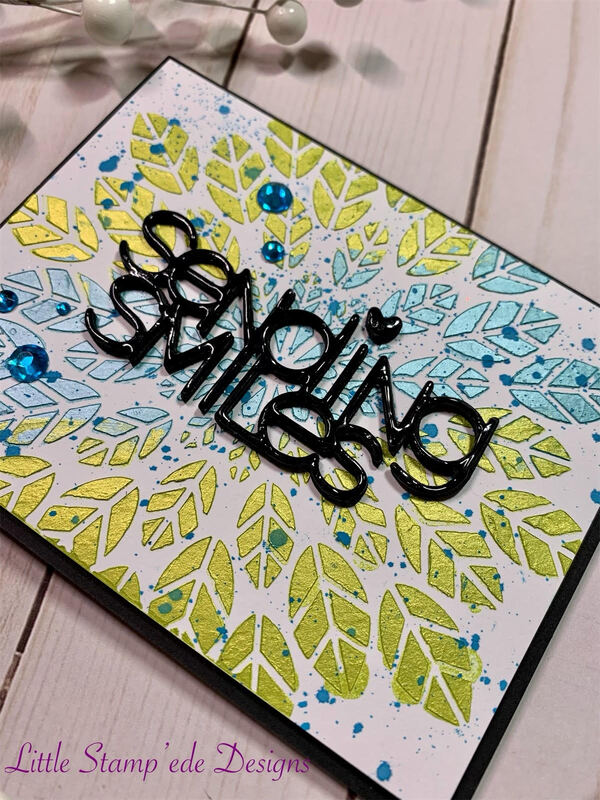 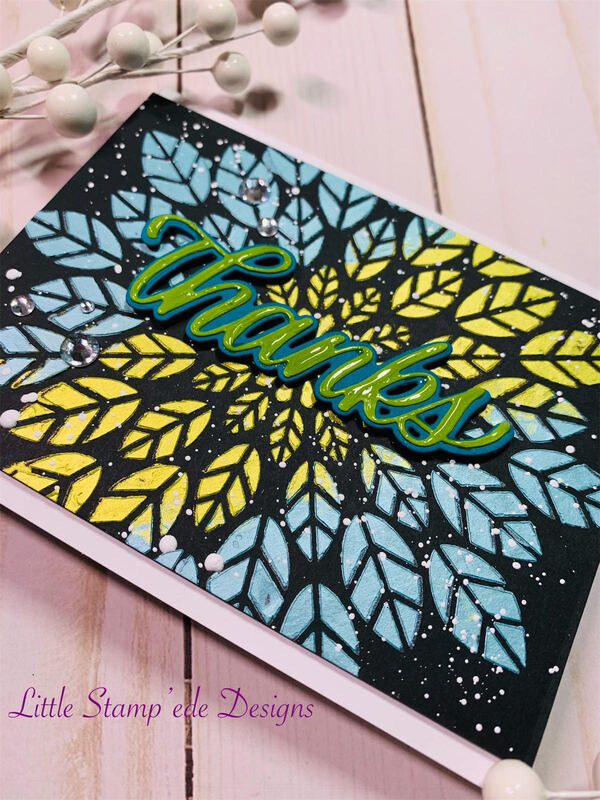 Happy Sunday everyone!! Today is the Growing In Unity Blog Hop and I am so excited to be part of the hop! I was the GIU Girl one of the weeks in May and I am honored to be asked to join in the hop! So let's hop! I have been itching to break out the Slimline Feather stamp by Angie Blom and this was the perfect occasion to play with it!! OMG - I love this stamp!!! It is so beautiful! I wanted to make something colorful, so I thought rainbows! So the first thing I did was mount the feather stamp in my Misti and chose the colors from my Memento Dew Drop inks. These smaller ink pads were perfect for this project! I chose the colors Pear Tart, Bahama Blue, Teal Zeal, Grape Jelly, Love Letter, Tangelo and Dandelion. Starting with the Pear Tart ink pad, I added ink gradually changing the colors as I went down the feather. I then stamped the feather image onto a piece of 110lb white cardstock that was already cut out by a stitched slimline die from Pinkfresh. I then re-colored the feather stamp in the same ink order and inked the image again to get a nice bold color. I then took out some Copic markers and added some "dots" around the feather in the same color scheme. I used colors YG13, B04, BG18, V09, R29, YR07 and Y18 for the "dots". I then took a piece of 110lb white card stock, sized it a little bigger than the card panel that the feather was stamped on, and ink blended the same Memento colors I used for the feather with blending brushes. I then popped the feather card panel onto the ink blended base with foam tape. I then picked the sentiment from the Your Heart and My Heart stamp set from Unity and inked it with Pear Tart, Bahama Blue and Teal Zeal and popped it with foam tape. I then added some matte enamel dots I had in my stash to complete the look. After it was done, I glued it onto a black 110lb card base with Bearly Art glue. It came out so beautiful! If you don't have this stamp set yet, it is a MUST HAVE! Thank you for "hopping" by and I hope you have a great day! Don't forget to comment for your chance to win one of (2) Unity Stamp grab bags!! Happy Crafting Y'all! 1. Chandhini https://thecreativetwins.blogspot.com/ 2. Sue https://stampingsueinconnecticut.blogspot.com/ 3. Sammi https://www.littlestampededesigns.com/ 4. Suzi https://suzannebakermckenzie.blogspot.com/ 5. Kristina https://mamasanity.blogspot.com/ 6. Sue https://suzyqstudio.wordpress.com/ 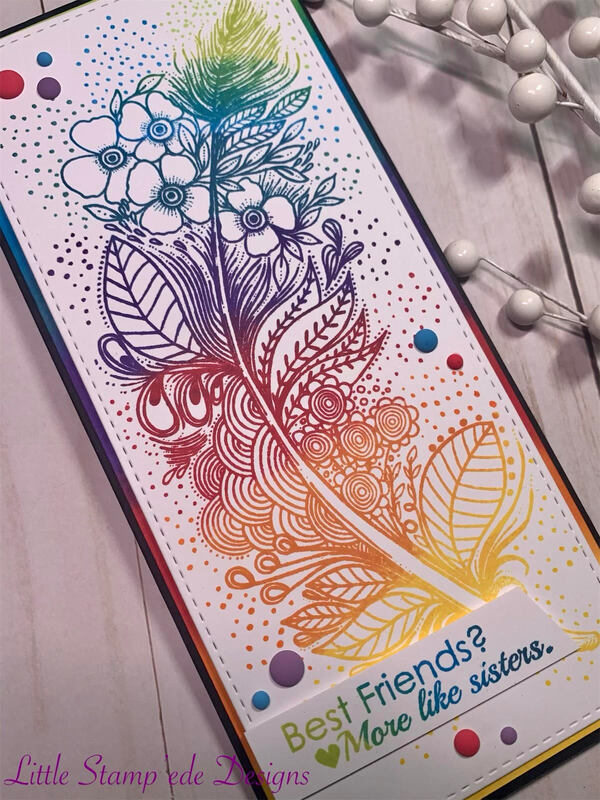 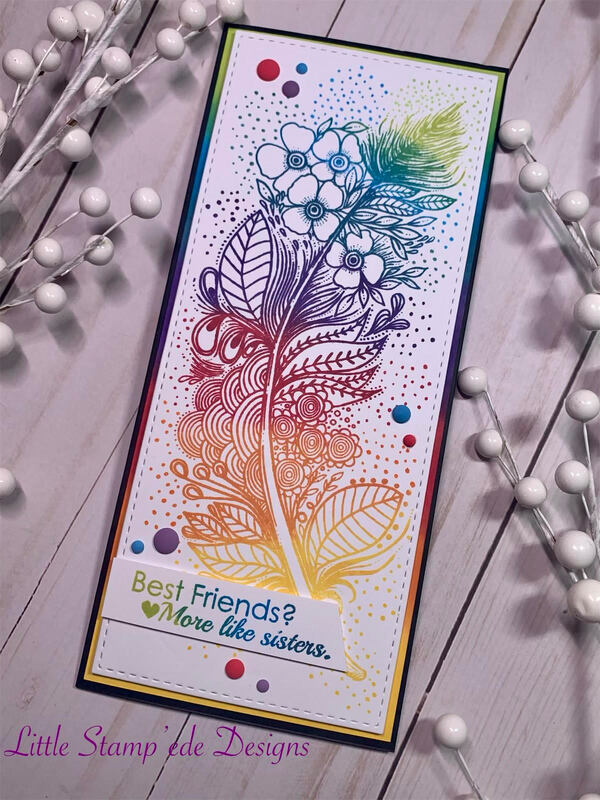 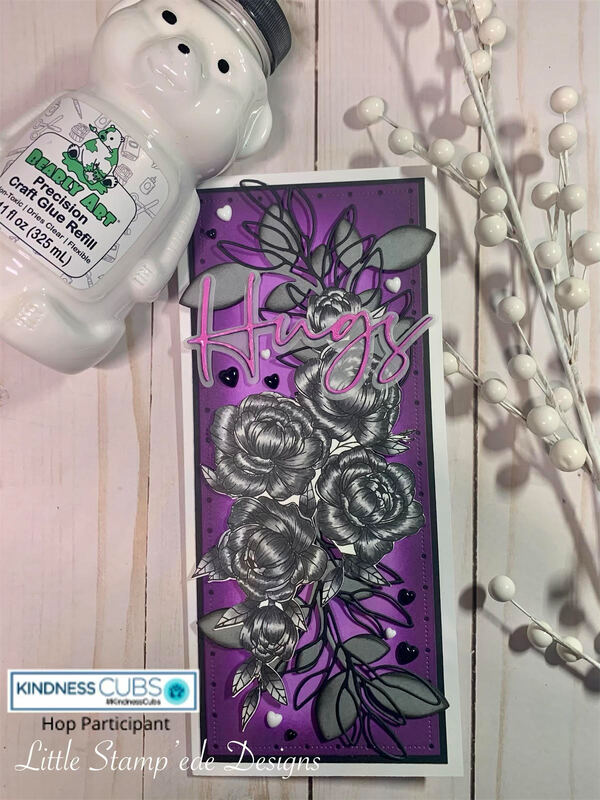 Happy Friday everyone!! Today is the Kindness Instagram Hop and I am excited to be participating in this hop! This hop is sponsored by Bearly Art glue, which you all know I love Bearly Art glue! There are great prizes too! For the hop, I decided to play with stamp set Friendship Blooms by Gina K Designs and Hero Arts, which I LOVE this stamp set! I was inspired by a shirt my best friend was wearing for the colors, which came out great! First I stamped the floral image with Hero Arts Intense Black ink, and cut it out with my Scan-N-Cut. I then colored it with Copic colors N7, N5, N3 and N0. I love the grayscale look! I then cut out leaves in black and gray using Simon Says Stamps Leaf Cluster and Leafy Branch dies. I edged the Cluster leaves with black to show some dimension. I then cut out a piece of white card stock with a slimline die from Gina Marie and then colored it with blending brushes using Pixie Dust and Royal Treatment inks from Catherine Pooler. I then picked out the sentiment from the Christopher's Sentiments dies from Brutus Monroe and cut the shadow portion out of vellum and the sentiment portion out of white 110lb cardstock. I then colored the sentiment with Pixie Dust ink. I then glued the sentiment onto the vellum using Bearly Art glue and then added some Glossy Accents from Ranger on the sentiment. While the Glossy Accents dried, I glued the leaves onto the purple card panel using Bearly Art glue, and then glued the flower image onto the leaves using Bearly Art glue. The parts of the flower image that hung over the leaves I used some foam tape to pop them up. I then glued the sentiment onto the leaves/floral image using Bearly Art glue. I then added some heart embellishments from Trinity Stamps using Bearly Art glue. After the card panel was complete, I glued it onto a black 110lb card base using Bearly Art glue. This turned out so great! I am so glad that my bestie's shirt gave me this inspiration!! I hope you will "hop" on over to my Instagram and hop the IG Hop! There are great prizes being given away and you will get to read about how crafters share kindness!! Happy Crafting Y'all!!  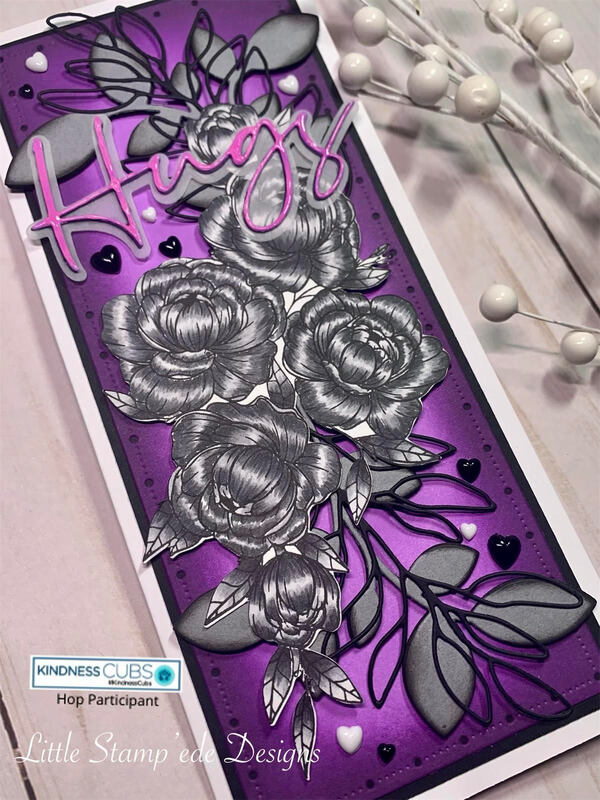 |
Follow Sammi:
AuthorI love to create and invite you to join me in my journey in this crazy paper crafting world we live in! 
Archives
February 2022
Categories |
 RSS Feed
