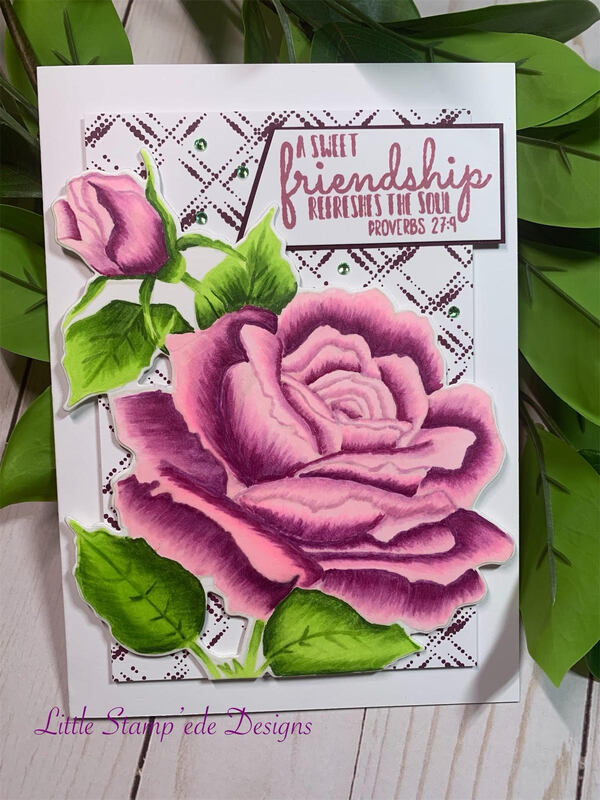
 Hello! One of my FAVORITE techniques is coloring with my COPIC markers. I LOVE them! The more I use them, the better I get. One of the techniques I have been wanting to try is no-line coloring. Well, I tried it and I love the results! I decided to break out the Sympathy Rose stamp set from Colorado Craft Company because I just love this rose and I had a go! First I stamped the rose image with Ink On 3 Fade Out ink onto a piece of 110lb Solar White Neenah cardstock, and them used the coordinating die from CCC to cut out the rose image. I then started coloring petal by petal using COPIC colors V06, RV66, RV63, RV02, and RV00. I went with the darker shades first and colored along the line of the stamped image for each petal. Before I knew it, the rose was done! I then moved onto the leaves using YG67, YG25 and YG01 using the same technique. I am very pleased with the results! I then stamped the Dotted Diamonds background stamp from Altenew with Sangria ink from Catherine Pooler onto a piece of white cardstock, and popped the rose onto it with some foam tape. I did not want to cut the rose image to fit a A2 card, so I went with a A7 card this time. I then popped the card panel onto a 110lb card base. I then stamped the sentiment from the Friend Cupcake stamp set from Colorado Craft Company in Rose Petals ink from Catherine Pooler, matted it with some Blackberry Bliss paper from Stampin Up, and then glued it onto the card panel with some Bearly Art Glue, then added some green crystal bling. I LOVE this card!! I will use this technique again soon! The Big and Bold stamp sets from Colorado Craft Company are great for this so give it a try!! Happy Crafting Y'all!! 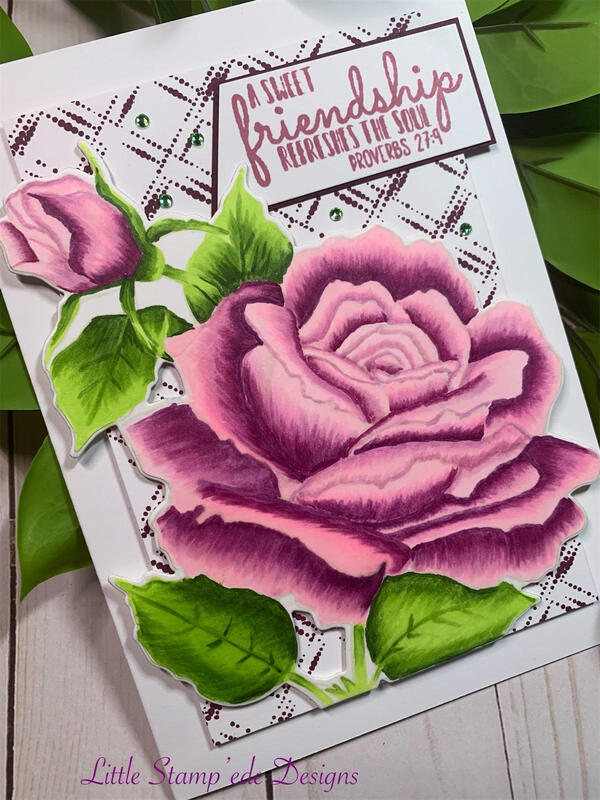 Hey everyone!! For today's card, I have decided to enter the challenge going on at Unity's Show & Tell Facebook page. The challenge is using a stamp from their Itty Bitty collection. I LOVE their Whiskey Than Tea stamp from the Itty Bitty collection, so I decided to use it along with their Dallas Girl stamp. I think she has some attitude that goes perfect with this sentiment! First I stamped the girl with black Memento ink. I then masked the image using post-it notes so I could add a sky background. I added the sky using the Cloud stencil from The Rabbit Hole Designs and Stone Blue ink from Catherine Pooler using a blender brush. I love these clouds! I then added the ground with Over Coffee ink from Catherine Pooler with a blender brush. I then I then colored the girl image with Copic Markers with these colors: B37, B23, B32, YR07, YR16, YR65, G19, G09, YG06, E13, E23, E25, E35, E21, and E59. I added some shadow in the dirt with my Copics after I colored her. I then got out a edger die from My Favorite Things and cut the bottom of the panel and added some green crystal bling. Using foam tape, I popped the panel on a piece of Dapper Denim cardstock from Stampin Up, and then glued it onto a 110lb white cardbase. This girl has some attitude and I love it!! I hope you all enjoy it! Happy Crafting Y'all! 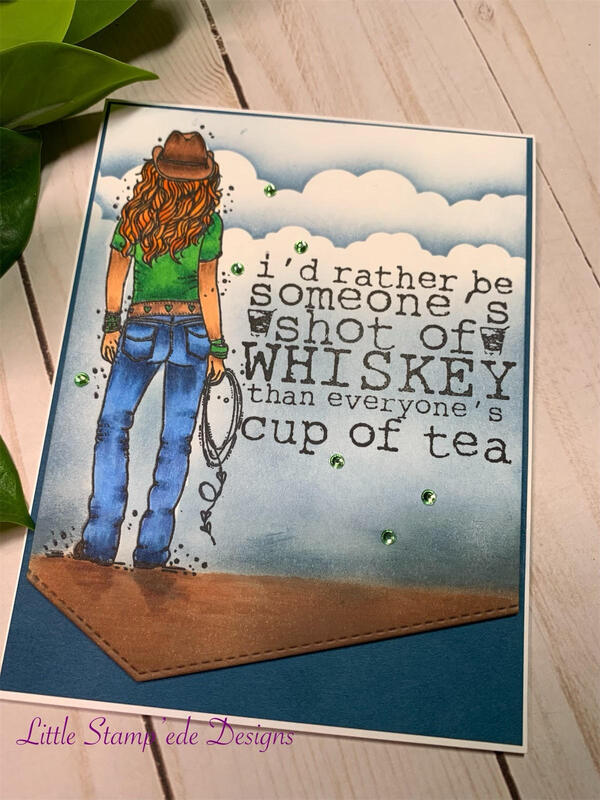 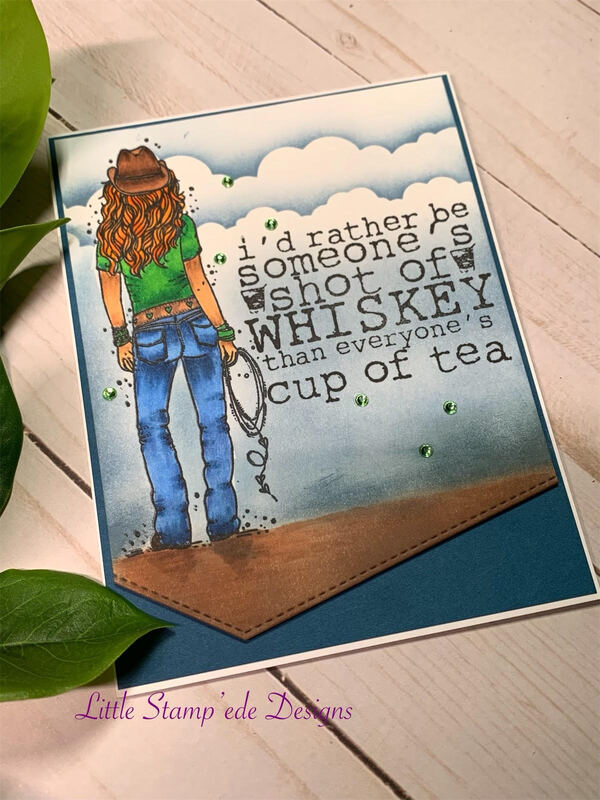 Hey everyone! Today is my final day as the Growing In Unity Girl and I have had so much fun this week! I want to say thank you to all of you that have stopped by and said hello and I hope that you have enjoyed my projects this week and that I have inspired you! I also want to thank Unity Stamp Co. for this awesome opportunity to showcase their AWESOME stamps and I hope that I have done them justice! For my final card this week, I went outside of my comfort zone on color choices. I usually gravitate towards purples and teals and with Spring in the air, I wanted to go with brighter colors. First, I stamped the flower image from the One of Those People stamp set onto 110lb Neenah Solar White with Memento black ink. I then cut the image out using my Scan-N-Cut. I love my Scan-N-Cut so I can cut out images that do not have coordinating dies. I then colored the flower image with Copic markers using colors YR09, YR16. Y17, YG67, YG25. YG01, B69 and B24. I then cut out a piece of 110lb cardstock with a deckled die from Tim Holz and stamped portions of it with the background stamp Love Story using Suede Shoes ink from Catherine Pooler. I stamped in three sections, the upper left hand corner, the lower left hand corner, and the right side middle edge. I then took the splatter stamp from the Unusual Day Poppy stamp set from Unity and added splatter marks using Orange Twist, Tiki Torch, and Suede Shoes inks from Catherine Pooler. I then stamped the sentiment from One of Those People stamp set in the Suede Shoes ink. I glued the flower image on the left hand side of the card panel using Bearly Art Precision Craft Glue and then I glued the sentiment on the lower left hand corner of the card panel. I wanted to add some more orange color, so I grabbed a stencil from Gabrielle Pollacco called Mini Jungle Vines and stenciled on a separate card panel using the Orange Twist ink. When I use a stencil, I keep the stencil in place using Mint Tape by Scrapbook.com, which is great! I have a hard time finding the Purple Tape, so I started using the Mint Tape and I love it. I then glued the stenciled card panel to a card base using Blueberry Bushel from Stampin Up. Then I popped up the deckled card panel onto the stenciled card panel using foam tape. I then added some blue enamel dots I had in my stash to complete the look. I am so glad that I went outside of my comfort zone when picking these colors. I love how it turned out and the colors pop! Closing out this week as the Growing In Unity Girl, I again want to say thank you for stopping by and checking out what I have been up to. If you have liked what you have seen, please click the Instagram icon on my blog and follow me on Instagram to see what I else I come up with! I would really appreciate a follow! Also, don't forget to comment for your change to win one of two $20 store credits to Unity Stamp! I will draw two names this weekend and announce the winners on Monday! Don't forget that the 10 Day Coloring Challenge is going on right now too! Happy Crafting Y'all! 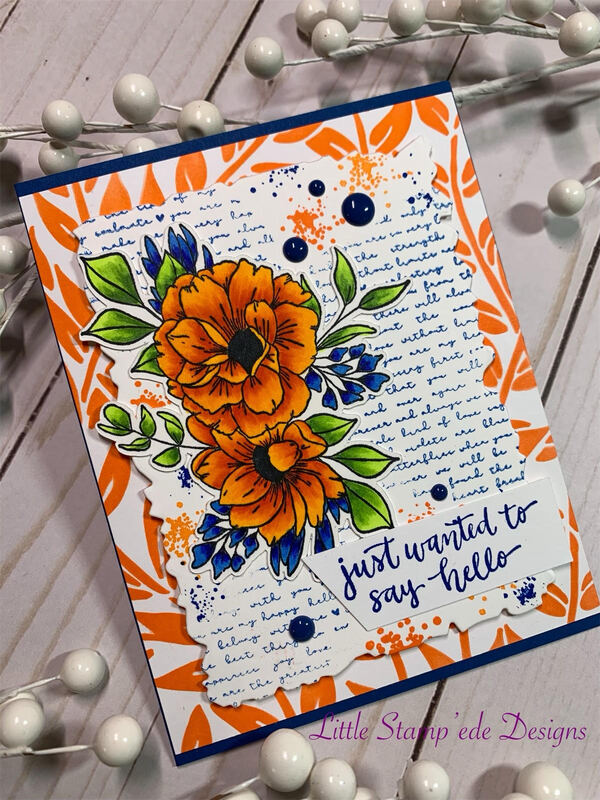 It's day four of my week as the Growing In Unity Girl, and it has been awesome! For today's project, I wanted to highlight background stamps. Unity has some GREAT background stamps! In fact, I subscribe to the Background of the Month membership and they are great! I chose the background stamp "Coming Up Roses" because I was inspired by a co-workers shirt, lol! It is funny where inspiration comes from, isn't it? I loved the little roses on her shirt and the color combo and how the colors popped, so I immediately thought of this background stamp. I wanted to color the roses with Copic markers, so I needed to use a ink that would work with alcohol markers. Since I wanted pink and yellow roses, I chose to stamp the roses with pink and color them yellow. Memento Ink has a wide assortment of colors, so I chose to use Rose Bud for this project. Using my Misti Stamp Positioning Tool, I stamped the background stamp on a card panel of 110lb Neenah Solar White cardstock with the Rose Bud ink to make sure that I get a nice and even stamped image. The Misti is a great tool for background stamps! Once the ink was dry, I colored the roses with Copic colors Y08, Y04 and Y00. For the sentiment, I chose to use the Sending Smiles die from Simon Says Stamp so I cut the sentiment out three times out of Daffodil Delight cardstock from Stampin Up. I then glued the pieces on top of each other to add depth using Bearly Art Precision Craft Glue. After I glued the pieces together, I thought it needed a little something extra, so I decided to top the sentiment with Glossy Accents from Ranger. I love this stuff! After the Glossy Accents dried, I then glued the sentiment onto the card panel and added some enamel dots in the coordinating colors of the card. I then popped the card panel onto a 110lb white card base with foam tape. I used 3M Scotch foam tape that I bought from Amazon. This is a simple card to make and I love that design inspiration can come from anywhere, even a co-workers shirt! Thank you for stopping by and don't forget to comment for your chance to win one of two $20 store credit to Unity! If you like what you see, please click the Instagram icon on my blog and follow me on Instagram to see what I else I come up with! See you all tomorrow! Today is also the first day of the 10 Day Coloring Challenge so I hope you all will join in on the fun! Happy Crafting Y'all! 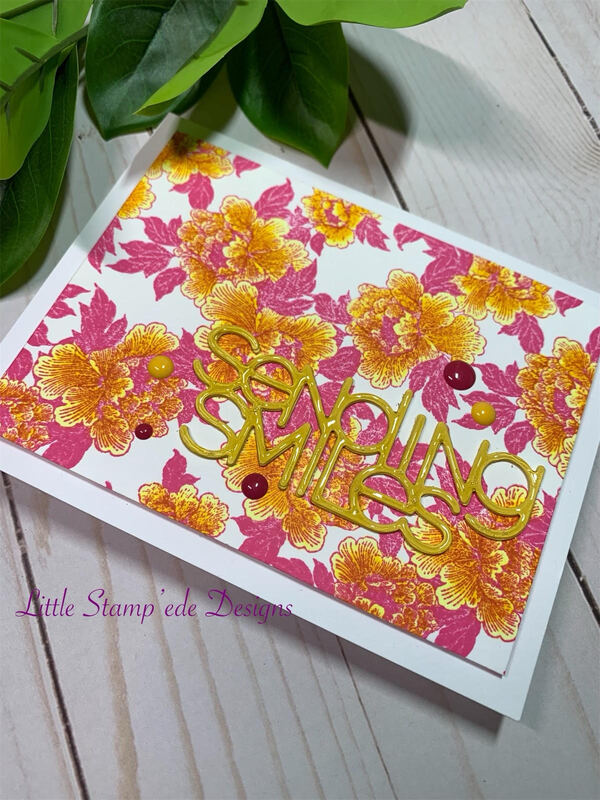 Day three of being the Growing In Unity Girl and I am having a blast! Thank you so much for stopping by this week to look at what I have been up to! For today's project, I decided to do a shaker card using the stamp set Coffee Queen, a Graciellie Design. I LOVE this stamp set! I love coffee stamps and flowers so it is the perfect combination! I like making shaker cards because they add that something extra to a card, making them fun! First, I had to come up a with a way to make the shaker pockets (as I call them) so I decided to use the Slimeline Windows Die from Whimsy Stamps. This is the perfect die to make shaker cards! With the slimline die, I cut two pieces of brown fun foam and one piece of Early Expresso cardstock from Stampin Up and then one piece of white cardstock. I then cut a card panel 3 1/2" X 8 1/2" using white cardstock. I then glued one piece of cut out fun foam to the white card base, followed by the second fun foam on top of the first fun foam using Bearly Art Precision Craft Glue. I used two piece of fun foam to add more depth to the shaker pockets. Using the negative pieces of the white cardstock cut from the Slimline Windows Die, I stamped the smaller squares and one rectangle piece with the coffee beans stamp in this set using Icing on the Cake ink from Catherine Pooler. I then stamped the coffee cup image on the other rectangle piece using Memento Ink, using the left side of the cup as my image. I then colored the coffee cup with Copic markers, colors BG78, BG18, BG15, E79, E87, E84, and E81. I then stamped the sentiment on the bigger rectangle piece using Skylight ink from Catherine Pooler and stamped some coffee beans around the sentiment using the same Icing on the Cake ink. I wanted some of window to serve as the shaker part of the card, and I wanted some to be solid. So I took the negatives of the fun foam and filled in two small squares and the center rectangle so that they would be solid. I then added the stamped white negative pieces to the places that would be the shaker part of the card, leaving the ones that would be part of the solid squares for later. After that was done, I cut out some acetate to glue to the Early Expresso slimline cut out only to where the squares would be part of the shaker card. I then filled the shaker card squares with some brown mixed sequins that I had in my stash. I then glued the Early Expresso/acetate portion on top to seal in the sequins. I had to let the glue dry so that the sequins would not stick to the sides. After the glue dried, I added the rest of the stamped white negative pieces to the solid sections of the card. I then stamped the coffee cup with Memento Ink and fussy cut it out. I then colored it with the same Copic colors that I used for the first coffee cup and glued it to the lower left side of the card. I then added some brown crystal bling around the sentiment. I glued the card panel to a piece of Island Indigo cardstock from Stampin Up and then onto a 110lb white card base. This is such a fun card and so fun to make! I highly recommend using fun foam when making shaker cards. The fun foam makes it so much easier! Thanks for stopping by to see what I have been up to and don't forget to comment for your chance to win one of two $20 store credit to Unity Stamp! If you like what you see, please click the Instagram icon on my blog and follow me on Instagram to see what I else I come up with! See you all tomorrow! Happy Crating Y'all!  Day two of my GIU Girl week! I have had such a great time creating fun projects using Unity Stamps and so excited to share them all with you this week! For today's card, I decided to play around with some watercoloring (which is not my strong suit) and play with the Unusual Day Poppy stamp set, a Graciellie Design. The poppy in this stamp set was so great to watercolor with! I decided to use my watercolors from Prima Marketing and selected the colors Pitaya and Shadow for this project. First, with the size of the poppy, I decided to make a slimline card for this one. I cut down a piece of coldpress watercolor paper to size. I then stamped the poppy image on the right hand side of the card panel using Ink on 3 Fadeout No Line Coloring Ink. Using a size #2 paintbrush, I then outlined the image with Pitaya watercolor and then used water to drag the color down adding color as I went. I went darker where I wanted to show shadow and just kept adding color and water until I got the color I wanted to achieve. I alternated using a #4 and #6 paintbrush. I decided to pair the pink color with gray, I used the Shadow watercolor for the leaf and the center of the poppy. I repeated the same process as I did with the poppy for the leaf and center of the poppy. One thing I did that helped was let the image dry, and then add more water and color to the areas that needed more. I noticed that it helped to let the image dry a little bit to know where I needed to add more color or water too. After the poppy was done, I then stamped the sentiment that came with the stamp set with Hero Arts Intense Black ink. I felt it needed something more, so I got out some Tim Holtz Hickory Smoke Distress Spray, and with a toothbrush, I flicked some splatter on the card panel. I then added some pink crystal bling to highlight the pink in the card. I then glued the card panel onto black cardstock and then glued it onto a 110lb gray cardstock card base. This sentiment is so great! I hope you enjoy my project! Don't forget to comment for your chance to win one of two $20 store credit to Unity Stamp! If you like what you see, please click the Instagram icon on my blog and follow me on Instagram to see what I else I come up with! See you all tomorrow! Happy Crafting Y'all! 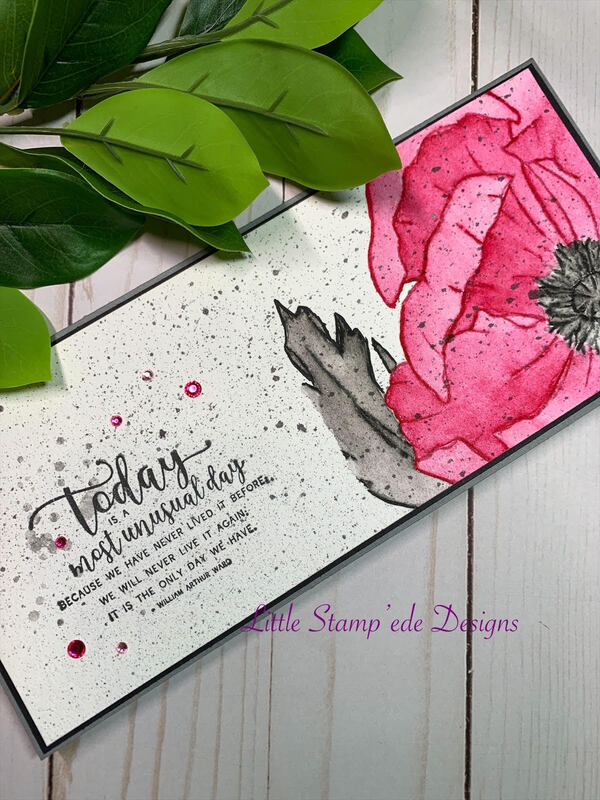 Today is the day I start my week as the Growing In Unity Girl to showcase Unity Stamp Co.'s stamps! I am so excited to show all of you what I have been up to! I discovered Unity Stamp Company a couple of years ago, and they quickly became a favorite! I love their style! For my first day, I have decided to showcase the "Everything Happens for a Reason" stamp set. I love this stamp because sunflowers are my FAVORITE! A technique that has caught my eye was the dotting technique so I thought this was the perfect stamp to showcase that technique. First thing I did was stamp the image on the 110lb Neenah Solar White card panel with black Memento Ink because I was going to use my Copic markers to color this image. After I stamped the image, I did colored the image with Copic colors YR09, YR16, Y17, YG67, YG25 and YG01. After I colored the image, I started "dotting" around the top of the image using the same Copic colors of the flowers, using the darker color first and dotted around the image. I then randomly dotted a couple of more layers with the darker color. I then added a couple of layers of the next shade of color and then ended the layers with the lightest color. The dotting was random to fill the spots I felt needed to be filled and followed the height of the stamp. I was pleased with the result! I then stamped the sentiment that came with the stamp set under the flower image using Hero Arts Intense Black ink and added some enamel dots that complimented the color scheme of the flowers. I then glued the card panel to Granny Apple Green cardstock from Stampin Up to bring out the green in the leaves of the image. I then glued the card panel to a 110lb black card base. I am very pleased with how this came out. It is a clean and simple card and I love that about it! Thanks for stopping by and have a great day! Don't forget to comment for a chance to win one of two $20 store credits to Unity Stamps! If you like what you see, please click the Instagram icon on my blog and follow me on Instagram to see what I else I come up with! See you tomorrow! Happy Crafing Y'all! 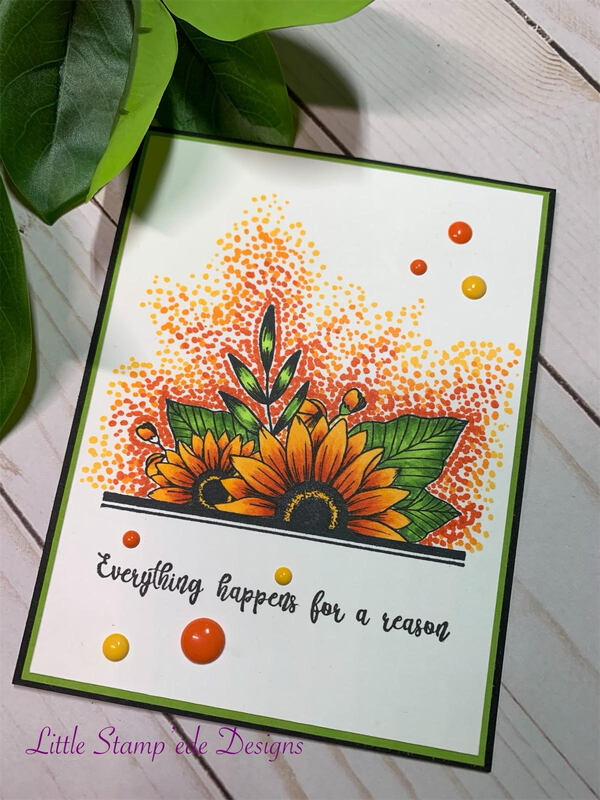 Hello there! I am so excited for my week as the Growing In Unity Girl this coming week! I have been busy making cards using Unity Stamp Co. stamps and I wanted to share a sneek peek of what I have been up to! Today's card is highlighting Unity Stamp Company's stamp set called Lawd Have Mercy, which I love because it is a little snarky! LOVE THAT! For this card, I also used the Bokeh Layering Stencil from Taylored Expressions. I situated the stencil on the left side of the card panel so that it only stenciled the left side, leaving room for the girl stamp. I used Flirty Fuchsia, Aquatini and Sweet Sixteen inks from Catherine Pooler in that order when using the number 1, 2, and 3 layered stencil. I then inked up the girl in the Unity stamp set with Hero Arts Intense Black ink and positioned her in the lower right hand corner of the card panel. I then stamped the "Lawd have mercy" sentiment stamp with the Aquatini ink and popped it up with foam tape. I then stamped the rest of the sentiment with the Intense Black ink. I then die cut the bottom of the card panel using a edge die from My Favorite Things. I picked out some Bermuda Bay cardstock from Stampin' Up to mat the white card panel and used the same edge die on the bottom. I then put it all together and glued it onto a black 110lb card base and added some purple and turquoise bling to match the "bubbles" that were created using the Bokeh stencil. This color combo is one of my favorite color combos and I love how this turned out! Starting Monday, I will post a new card every day of the week up to Friday highlighting Unity Stamp Company's stamps. I love their stamps and I hope you enjoy what I have come up with! Happy Crafting Y'all!! 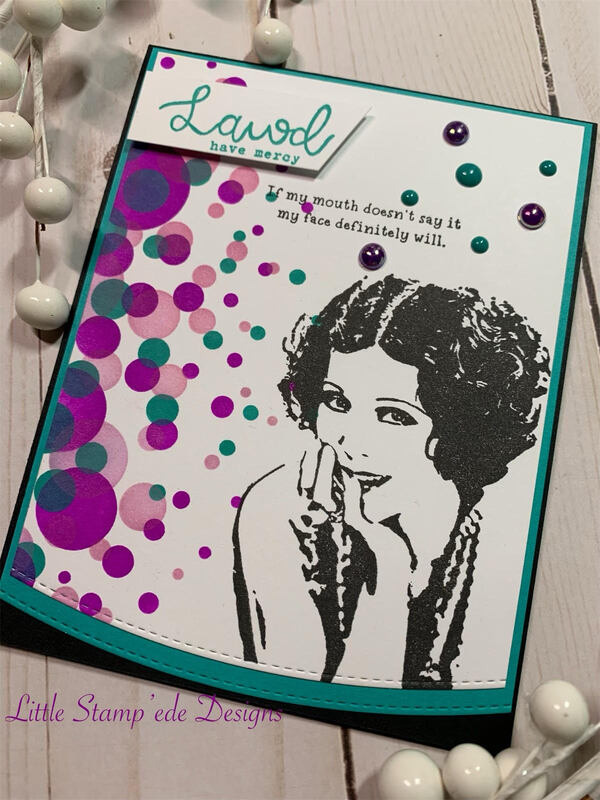 Hi everyone!! Yes I am back! I took some time off and now I am back stronger than ever! Sooo.....my boss wanted a card for a wedding, so I had to come up with a wedding card. I have to admit that I do not have a lot of wedding stamps, and then I remembered a old stamp set from Stampin' Up called Wonderful Moments that had a bride in it and it's perfect! I paired it up with a sentiment from a Stampin' Up stamp set Word Play and I let the creative juices flow! First, I wanted to emboss the background so I picked the Tufted embossing folder from Stampin' Up and embossed a piece of 4"x5.25" 110lb white cardstock. I then cut a piece of Elegant Eggplant cardstock from Stampin' Up to stamp the bride image on using my WOW! Embossing Pad, and then embossed the image using Fine Detail White embossing power from Simon Says Stamp. I then found some silver cardstock in my stash and stamped the sentiment using Stazon ink. I wanted to use Stazon ink because of the metallic surface of the silver cardstock. I then popped up the Elegant Eggplant strip and the sentiment with some foam tape and added clear rhinestones to the embossed area and around the bride and added purple rhinestones on the sentiment strip. I used some black cardstock to mat it, and then glued it to a 110lb cardstock card base. It was very easy and I was done in less than a hour. I was going for a elegant look, and I think I achieved it! Next week, I am the Growing In Unity Girl for the Unity Stamp Company's Facebook page and I am so excited! I have been working on some awesome cards so I hope you will stop by and see what I am up to! Happy Crafting Y'all! 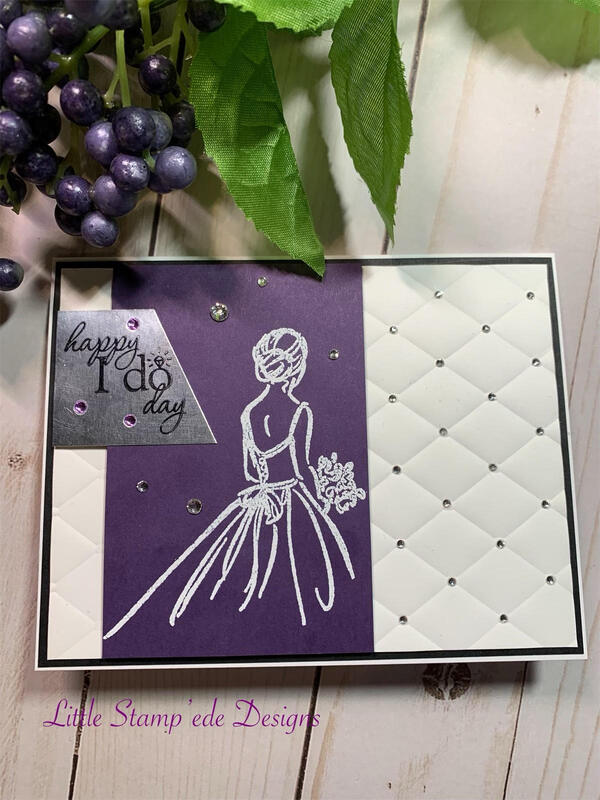 |
Follow Sammi:
AuthorI love to create and invite you to join me in my journey in this crazy paper crafting world we live in! 
Archives
February 2022
Categories |
 RSS Feed
