|
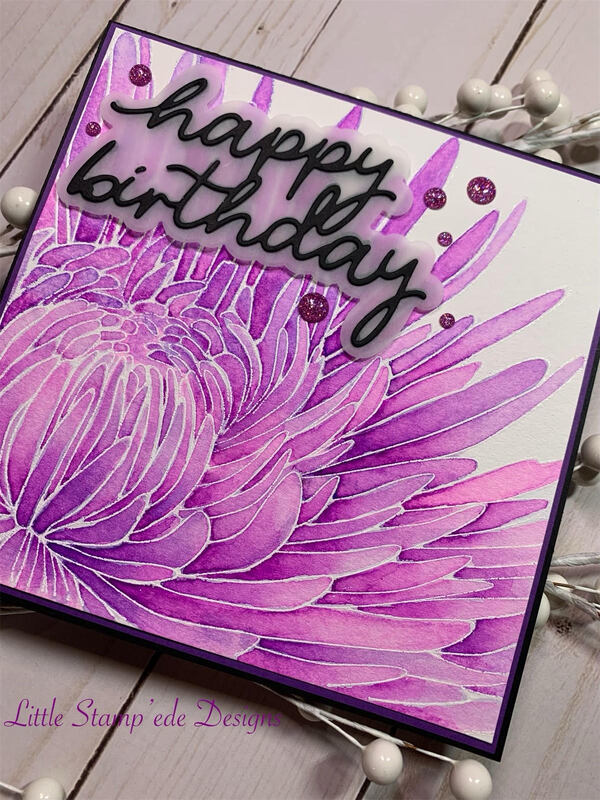
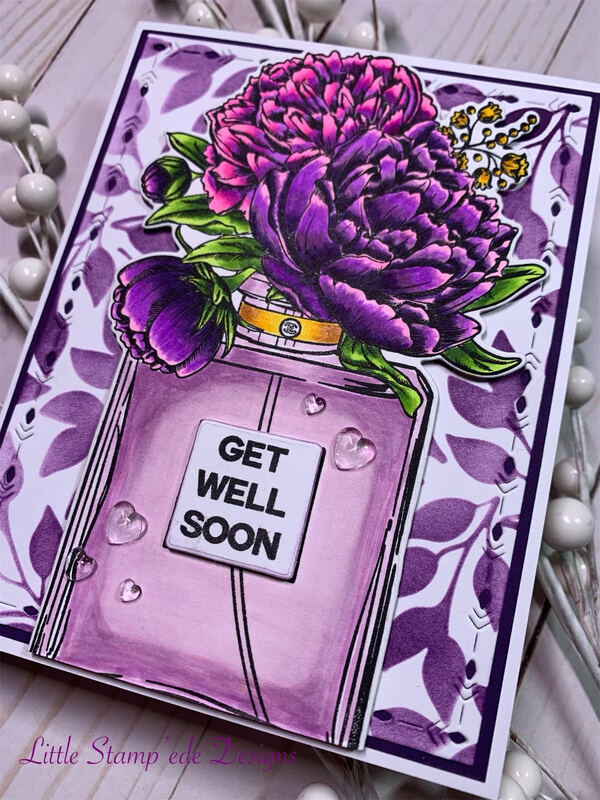
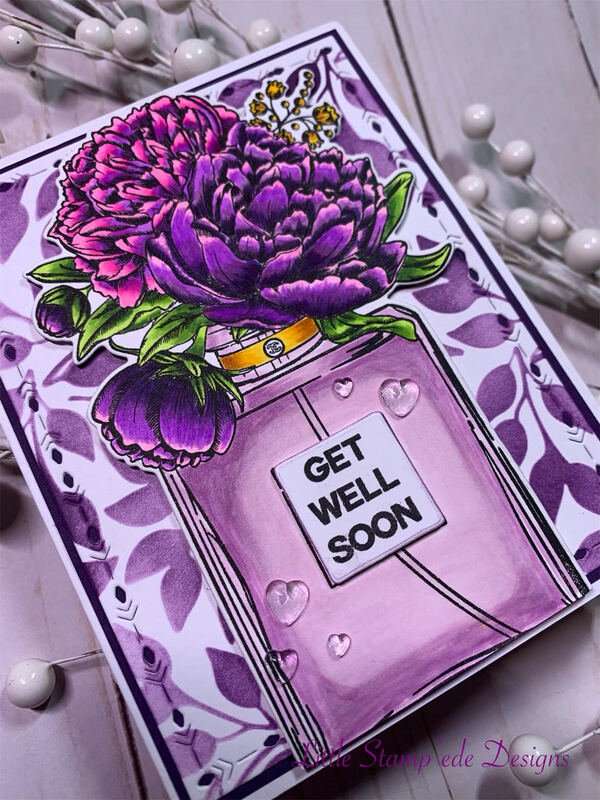
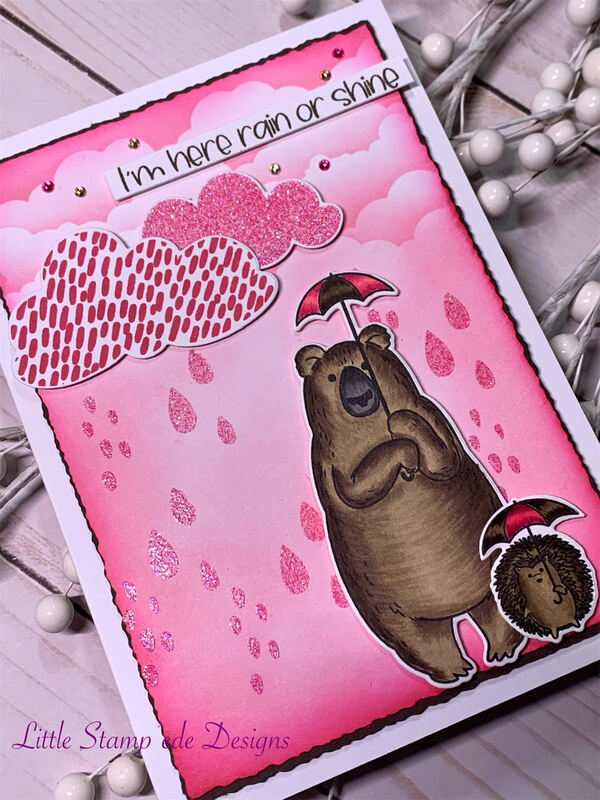
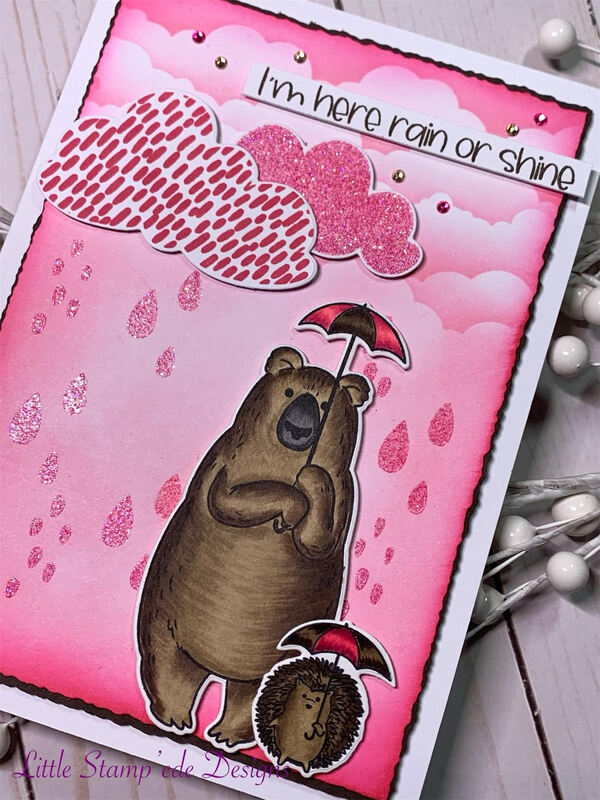
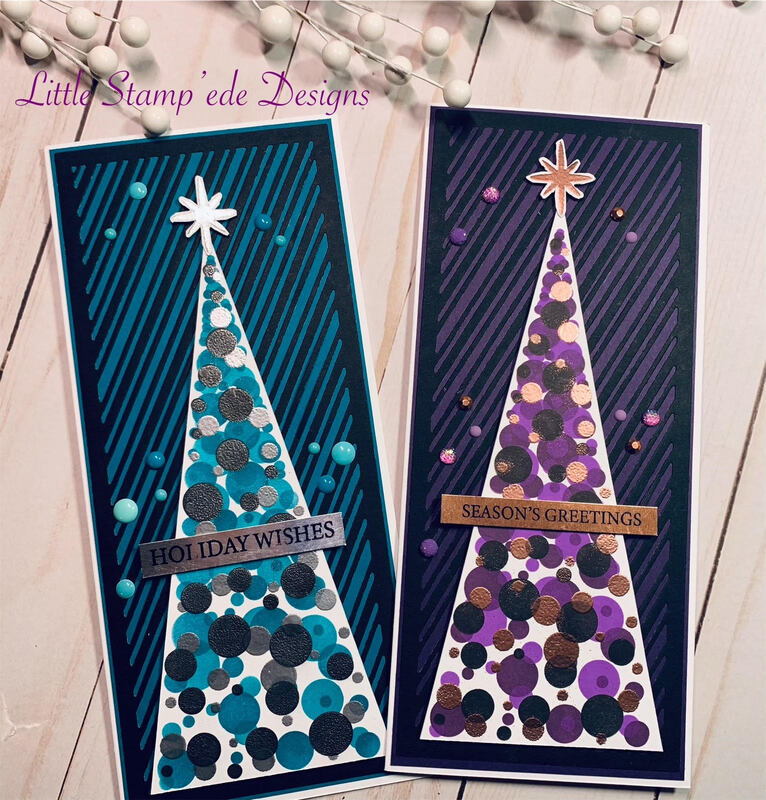
Happy Sunday everyone!! Today is the Growing In Unity Blog Hop and I am so excited to be part of the hop! I was the GIU Girl one of the weeks in May and I am honored to be asked to join in the hop! So let's hop! I have been itching to break out the Slimline Feather stamp by Angie Blom and this was the perfect occasion to play with it!! OMG - I love this stamp!!! It is so beautiful! I wanted to make something colorful, so I thought rainbows! So the first thing I did was mount the feather stamp in my Misti and chose the colors from my Memento Dew Drop inks. These smaller ink pads were perfect for this project! I chose the colors Pear Tart, Bahama Blue, Teal Zeal, Grape Jelly, Love Letter, Tangelo and Dandelion. Starting with the Pear Tart ink pad, I added ink gradually changing the colors as I went down the feather. I then stamped the feather image onto a piece of 110lb white cardstock that was already cut out by a stitched slimline die from Pinkfresh. I then re-colored the feather stamp in the same ink order and inked the image again to get a nice bold color. I then took out some Copic markers and added some "dots" around the feather in the same color scheme. I used colors YG13, B04, BG18, V09, R29, YR07 and Y18 for the "dots". I then took a piece of 110lb white card stock, sized it a little bigger than the card panel that the feather was stamped on, and ink blended the same Memento colors I used for the feather with blending brushes. I then popped the feather card panel onto the ink blended base with foam tape. I then picked the sentiment from the Your Heart and My Heart stamp set from Unity and inked it with Pear Tart, Bahama Blue and Teal Zeal and popped it with foam tape. I then added some matte enamel dots I had in my stash to complete the look. After it was done, I glued it onto a black 110lb card base with Bearly Art glue. It came out so beautiful! If you don't have this stamp set yet, it is a MUST HAVE! Thank you for "hopping" by and I hope you have a great day! Don't forget to comment for your chance to win one of (2) Unity Stamp grab bags!! Happy Crafting Y'all! 1. Chandhini https://thecreativetwins.blogspot.com/ 2. Sue https://stampingsueinconnecticut.blogspot.com/ 3. Sammi https://www.littlestampededesigns.com/ 4. Suzi https://suzannebakermckenzie.blogspot.com/ 5. Kristina https://mamasanity.blogspot.com/ 6. Sue https://suzyqstudio.wordpress.com/ 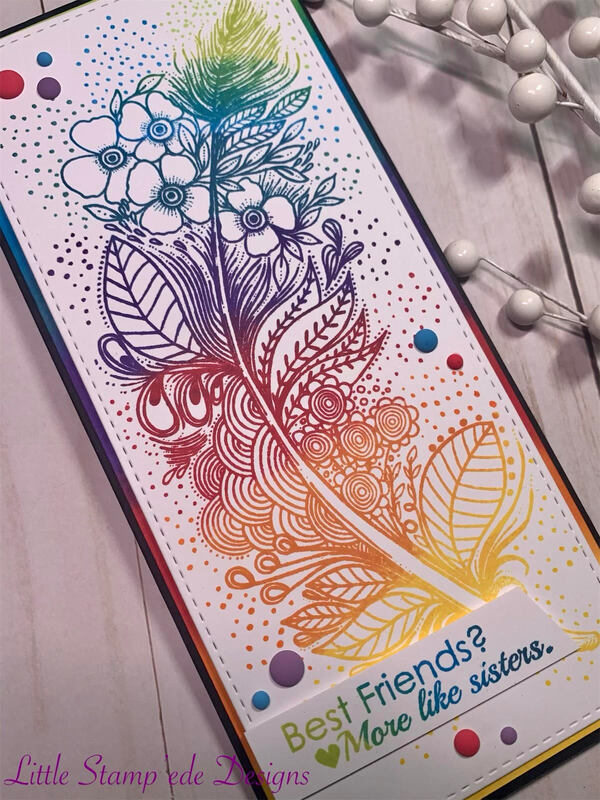 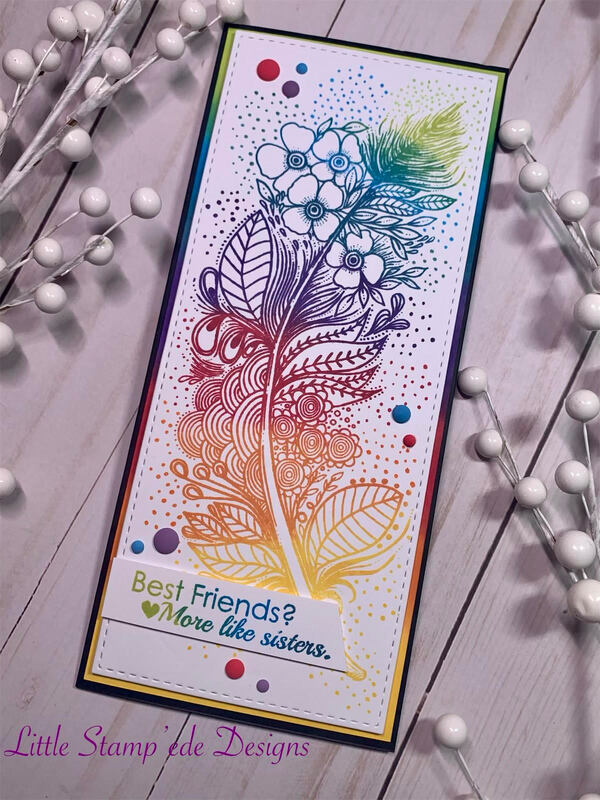 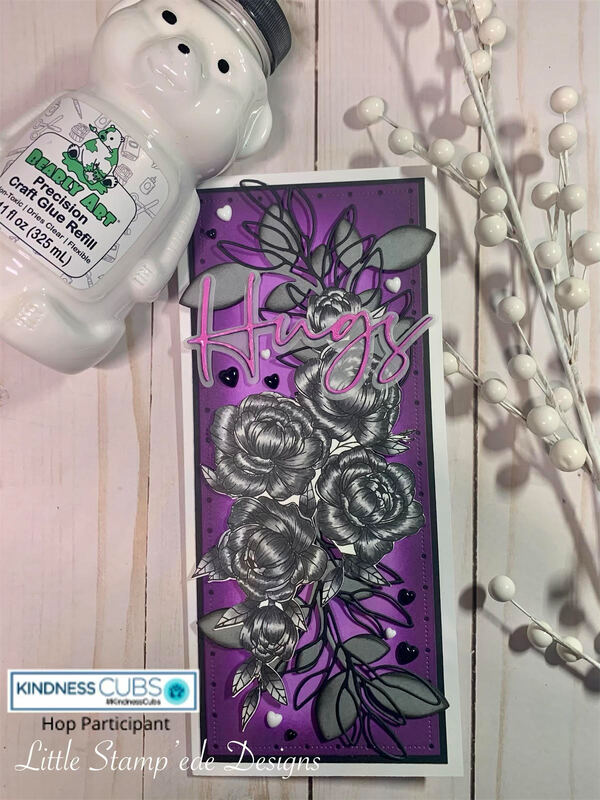 Happy Friday everyone!! Today is the Kindness Instagram Hop and I am excited to be participating in this hop! This hop is sponsored by Bearly Art glue, which you all know I love Bearly Art glue! There are great prizes too! For the hop, I decided to play with stamp set Friendship Blooms by Gina K Designs and Hero Arts, which I LOVE this stamp set! I was inspired by a shirt my best friend was wearing for the colors, which came out great! First I stamped the floral image with Hero Arts Intense Black ink, and cut it out with my Scan-N-Cut. I then colored it with Copic colors N7, N5, N3 and N0. I love the grayscale look! I then cut out leaves in black and gray using Simon Says Stamps Leaf Cluster and Leafy Branch dies. I edged the Cluster leaves with black to show some dimension. I then cut out a piece of white card stock with a slimline die from Gina Marie and then colored it with blending brushes using Pixie Dust and Royal Treatment inks from Catherine Pooler. I then picked out the sentiment from the Christopher's Sentiments dies from Brutus Monroe and cut the shadow portion out of vellum and the sentiment portion out of white 110lb cardstock. I then colored the sentiment with Pixie Dust ink. I then glued the sentiment onto the vellum using Bearly Art glue and then added some Glossy Accents from Ranger on the sentiment. While the Glossy Accents dried, I glued the leaves onto the purple card panel using Bearly Art glue, and then glued the flower image onto the leaves using Bearly Art glue. The parts of the flower image that hung over the leaves I used some foam tape to pop them up. I then glued the sentiment onto the leaves/floral image using Bearly Art glue. I then added some heart embellishments from Trinity Stamps using Bearly Art glue. After the card panel was complete, I glued it onto a black 110lb card base using Bearly Art glue. This turned out so great! I am so glad that my bestie's shirt gave me this inspiration!! I hope you will "hop" on over to my Instagram and hop the IG Hop! There are great prizes being given away and you will get to read about how crafters share kindness!! Happy Crafting Y'all!!  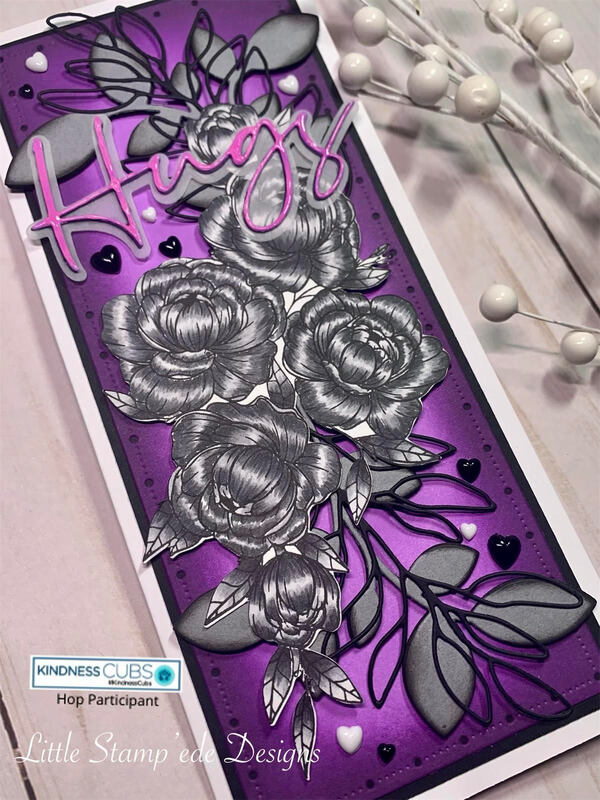 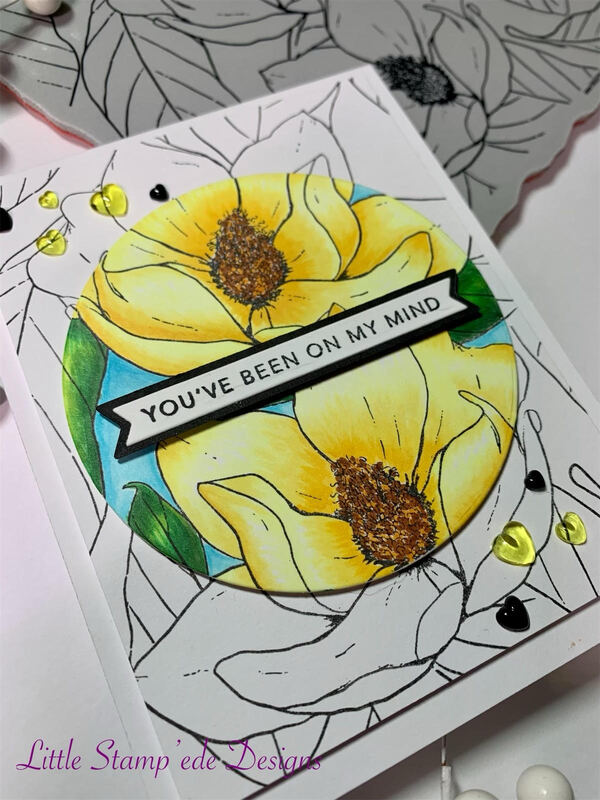 Hey everyone! It is Wednesday, and only a couple of days away from a long weekend! I am going to Craft Camp on Friday and crafting all weekend long! I am also going to be part of a IG Hop for Bearly Art glue, so I hope that you will stop by on Friday to see what I I am up to! For today's card, I decided to play with the Magnolia Background stamp from Simon Says Stamp. I really love this stamp! First, I got out my circle dies from Elizabeth Crafts and cut out a circle that would fit a A2 card panel. I then took a white card panel that would fit a A2 card and stamped the Magnolia image using Hero Arts Intense Black ink. I then took my circle and stamped the image to where I could line it up on the card panel. I then colored the circle image with Copic colors Y15, Y13, Y11, Y00, YR24, E37, B01, B00, B000, G07, YG09, and YG01. I then lined up the circle to match the card panel image and popped it up with foam tape. I then stamped and cut the sentiment using Taylored Expressions Simple Strips and popped it with foam tape. I then popped the card panel onto a 110lb white card base using foam tape. I then added some yellow and black heart embellishments from Trinity Stamps. I really like how this came out. It's a more subtle card and looks soft. As I mentioned before, I am part of the Bearly Art glue IG hop on Friday, which starts at 10:00AM Pacific Time, so I hope you come see what it is all about! See you all then!! Happy Crafting Y'all!! 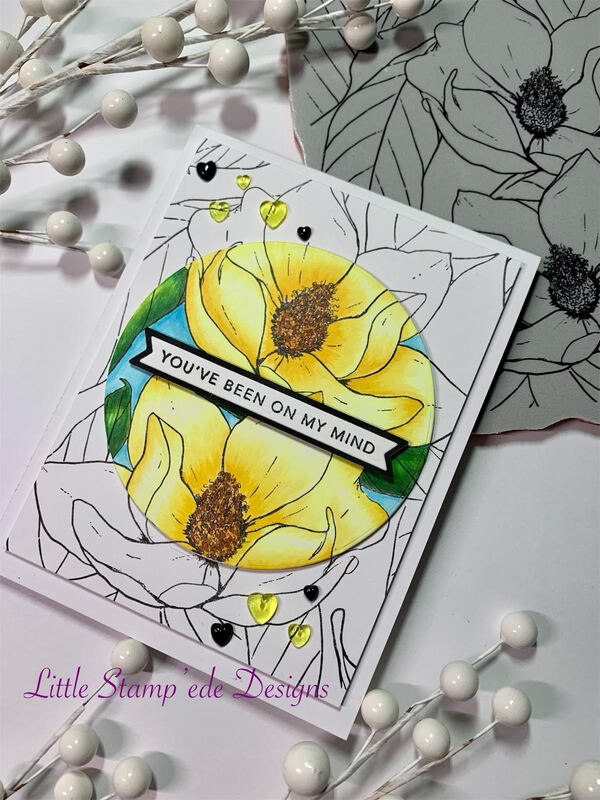 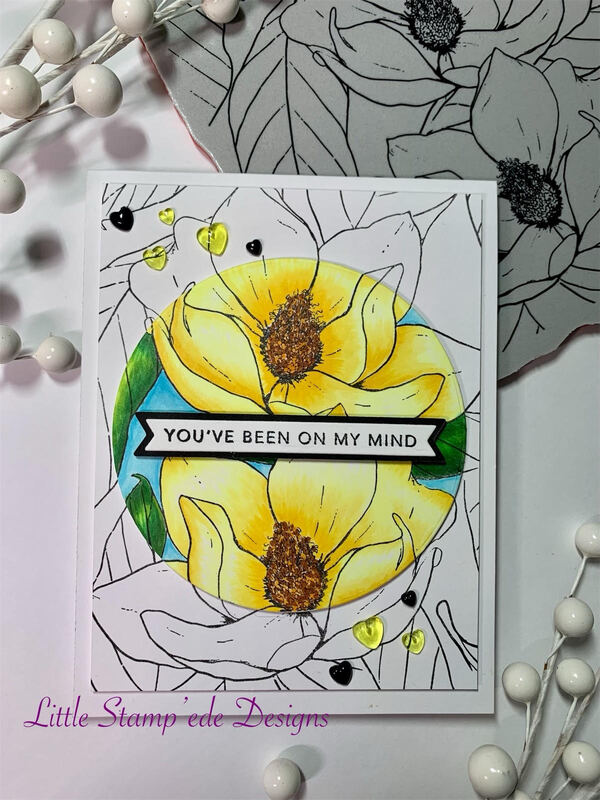 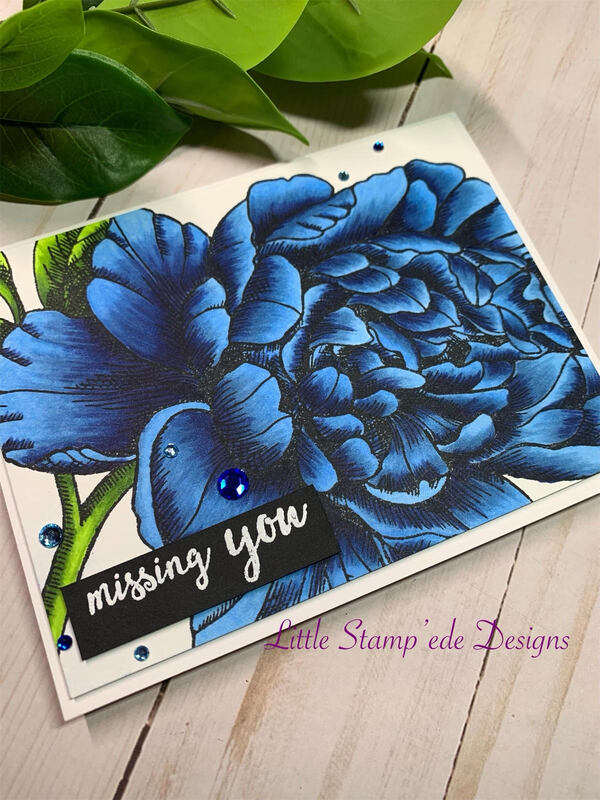 Well hello everyone! It has been a few days since I have posted and I wanted to check in with y'all to see how your weekend is going! It is Sunday early everying here in Northern Cali and I am getting ready to BBQ some burgers and corn on the cob! Yum!! But first, I wanted to share a card I made with Colorado Craft Company's stamp set Miss You Peony. This stamp set is AWESOME! I love this flower! So bold and beautiful!! I did not want to go traditional with the colors, so I went with blue this time and WOWZERS! First, I stamped the peony flower image with back Memento ink since I was going to color it with my Copic markers. I then cut it down to size to fit a A2 sized card base. I then colored the image using Copic colors B39, B45, B32, YG67, YG25 and YG01. I then lined up the sentiment from the same stamp set and used WOW embossing ink to stamp the sentiment and then heat embossed the sentiment using Simon Says Stamp ultra fine white embossing power. I then popped the sentiment onto the card panel using foam tape and then added some blue bling I had in my stash. I then popped the card panel onto a white 110lb card base using foam tape. This bold flower doesn't need anything else for it speaks for itself!! Love it!! I hope y'all are having a great weekend and I will see you later this week!! Happy Crafting Y'all!! 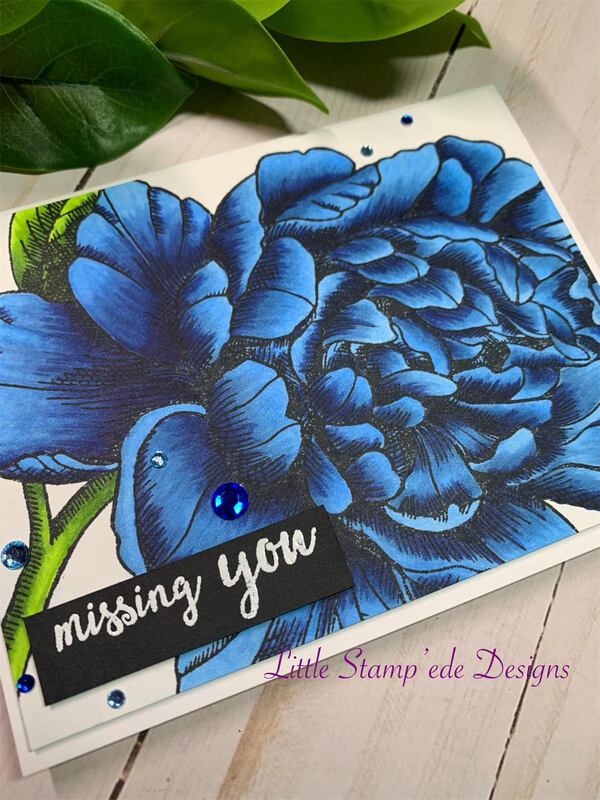 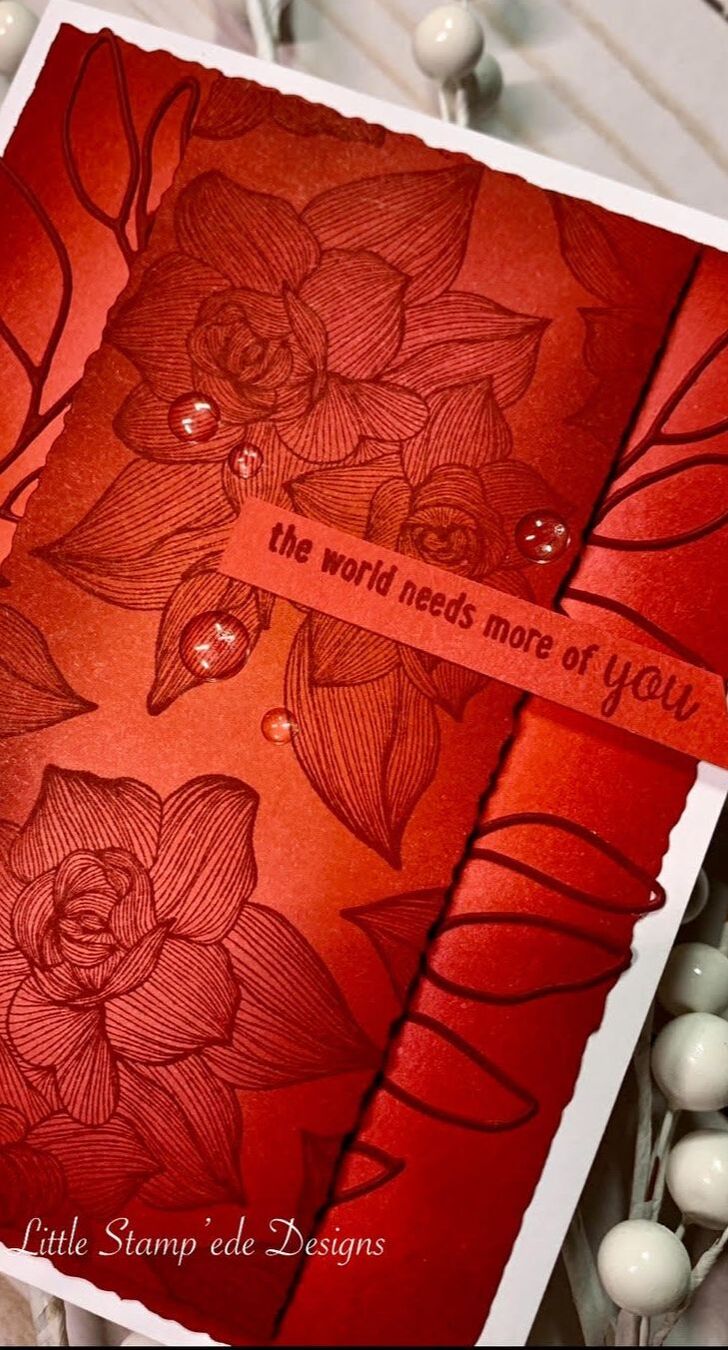 Hey everyone! It is Wednesday!! I have been trying to find time to make a card for the Unity Stamp Co.'s monthly challenge on the Unity {show & tell} Facebook page and finally decided on what to make. The theme this month is Monochromatic and I wanted to go with red because I don't work with red enough. Since I was not going to color with markers on this project, I decided to go with the Fear Not stamp set from Unity which was a great stamp to work with on this project. First, I got out my inks I wanted to blend with, which are Cranberry Fizz, Rockin' Red and Samba from Catherine Pooler. Then I got out a piece of 110lb white cardstock and cut it down to the size I wanted for my card panel and cut another piece to the size I wanted to run down the middle of my card panel using Tim Holtz's Deckle Cutter. I then ink blended both pieces. I then stamped the rose image from the Fear Not stamp set in multiple directions using the Cranberry Fizz ink. I then cut out some leaves using the Tender Leaf die from Simon Says Stamp and colored them with the Cranberry Fizz ink. I then glued the leaves onto the card panel using Bearly Art glue and then popped the middle card panel onto the main card panel using foam tape. I then stamped the sentiment using a sentiment from the May 2020 Sentiment Kit "hello sweetheart bouquet" and popped that up with some foam tape. I then added some clear enamel dots from Gina Marie. It is a simple card to make, and ink blending is a beautiful technique! I hope you all have a great day and I will see you later this week!! Happy Crafting Y'all! 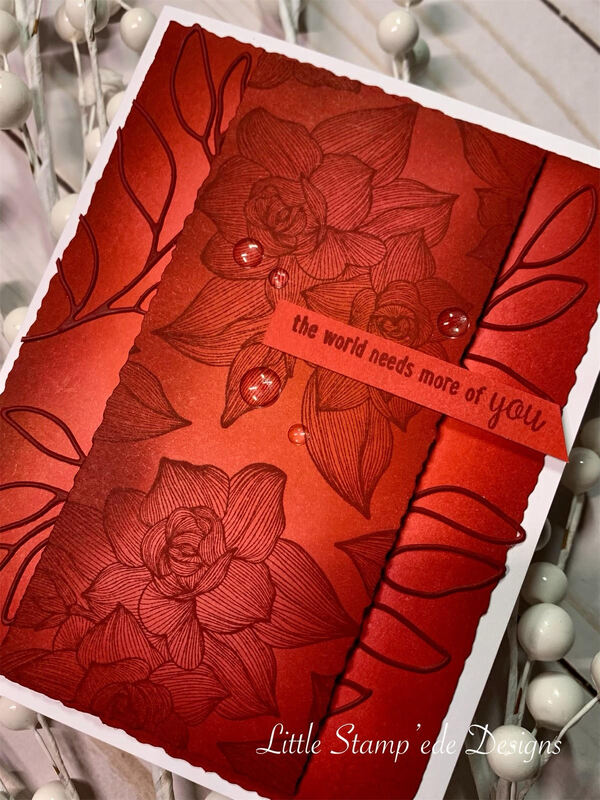 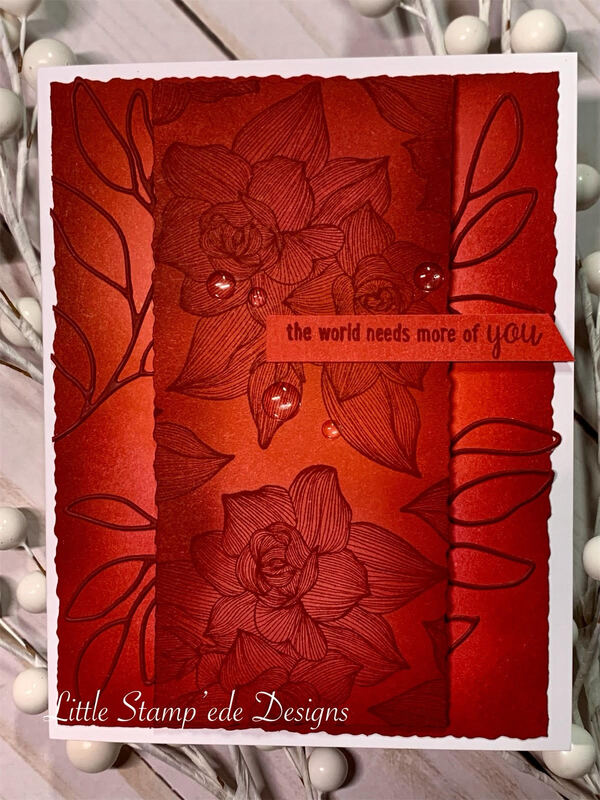 Hey everyone! Today I am sharing a card I made for the Wow! Embossing Challenge for the month of May. I LOVE Wow! embossing powders! I have so many of their colors and I love them! For today's card, I chose to work with the Spring Blooms Background stamp from Honey Bee Stamps. This stamp is GORGEOUS! First, using Wow! Embossing ink, I inked up the stamp and stamped the image using my Misti onto a piece of 110lb white cardstock. I then sprinkled Wow! Splash embossing powder and heat set it. It sparkles and looks awesome! I then set that aside and stamped a piece of 110lb Neenah Solar White cardstock using black Memento ink the same stamp image because I was going to color with my Copic markers. After I stamped it in black, I colored the image using Copic colors BG78, BG23, BG18, BG15, BG10, E59, E57, and E13. After I was done coloring, I cut the Copic colored image down to size so that it would fit in the middle of the embossed image, and then I aligned the Copic panel with the embossed image to match the scene. The look I wanted was that the image would flow from the Copic panel to the embossed image perfectly. Once the scene matched, I glued the Copic panel onto the embossed panel using Bearly Art glue. I then popped the card panel onto a 110lb black card base using foam tape. I then added the sentiment from Talyored Expressions Simple Strips by popping it with some foam tape and then added some enamel dots I had in my stash. I absolutely love how this turned out! I hope you enjoy it and have a great week! Happy Crafting Y'all!! 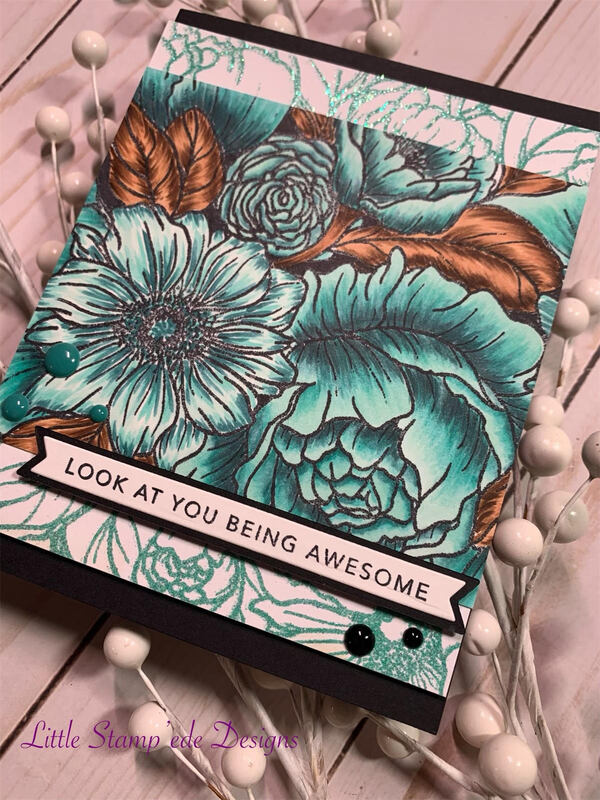 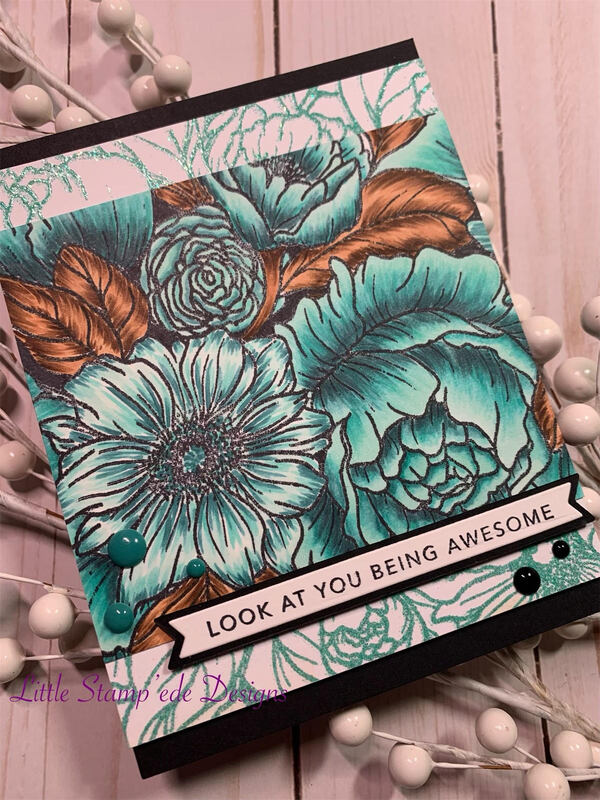 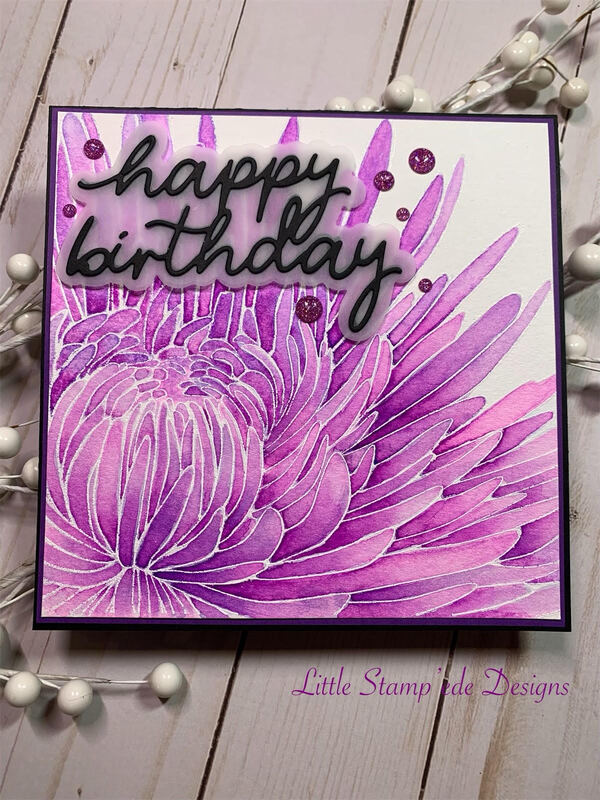 Happy Sunday everyone! Today is one of my best friends birthday, so I wanted to share a card that I made for her. Her favorite color is purple and I decided to do a little watercoloring with my Karin and Altenew Watercolor Markers. Watercoloring is not my strongest suit, but I love challenging myself, so I jumped right in! |
Follow Sammi:
AuthorI love to create and invite you to join me in my journey in this crazy paper crafting world we live in! 
Archives
February 2022
Categories |

 RSS Feed
