|
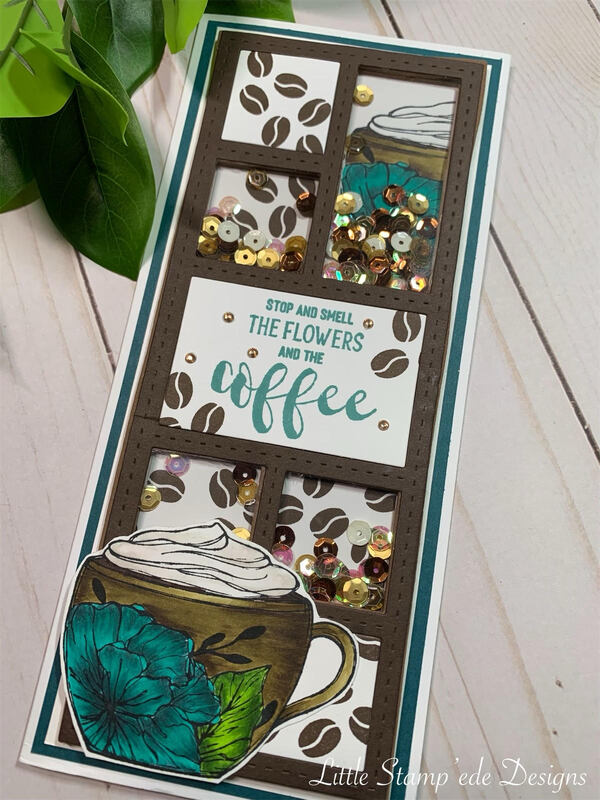
Day three of being the Growing In Unity Girl and I am having a blast! Thank you so much for stopping by this week to look at what I have been up to! For today's project, I decided to do a shaker card using the stamp set Coffee Queen, a Graciellie Design. I LOVE this stamp set! I love coffee stamps and flowers so it is the perfect combination! I like making shaker cards because they add that something extra to a card, making them fun!
First, I had to come up a with a way to make the shaker pockets (as I call them) so I decided to use the Slimeline Windows Die from Whimsy Stamps. This is the perfect die to make shaker cards! With the slimline die, I cut two pieces of brown fun foam and one piece of Early Expresso cardstock from Stampin Up and then one piece of white cardstock. I then cut a card panel 3 1/2" X 8 1/2" using white cardstock. I then glued one piece of cut out fun foam to the white card base, followed by the second fun foam on top of the first fun foam using Bearly Art Precision Craft Glue. I used two piece of fun foam to add more depth to the shaker pockets. Using the negative pieces of the white cardstock cut from the Slimline Windows Die, I stamped the smaller squares and one rectangle piece with the coffee beans stamp in this set using Icing on the Cake ink from Catherine Pooler. I then stamped the coffee cup image on the other rectangle piece using Memento Ink, using the left side of the cup as my image. I then colored the coffee cup with Copic markers, colors BG78, BG18, BG15, E79, E87, E84, and E81. I then stamped the sentiment on the bigger rectangle piece using Skylight ink from Catherine Pooler and stamped some coffee beans around the sentiment using the same Icing on the Cake ink. I wanted some of window to serve as the shaker part of the card, and I wanted some to be solid. So I took the negatives of the fun foam and filled in two small squares and the center rectangle so that they would be solid. I then added the stamped white negative pieces to the places that would be the shaker part of the card, leaving the ones that would be part of the solid squares for later. After that was done, I cut out some acetate to glue to the Early Expresso slimline cut out only to where the squares would be part of the shaker card. I then filled the shaker card squares with some brown mixed sequins that I had in my stash. I then glued the Early Expresso/acetate portion on top to seal in the sequins. I had to let the glue dry so that the sequins would not stick to the sides. After the glue dried, I added the rest of the stamped white negative pieces to the solid sections of the card. I then stamped the coffee cup with Memento Ink and fussy cut it out. I then colored it with the same Copic colors that I used for the first coffee cup and glued it to the lower left side of the card. I then added some brown crystal bling around the sentiment. I glued the card panel to a piece of Island Indigo cardstock from Stampin Up and then onto a 110lb white card base. This is such a fun card and so fun to make! I highly recommend using fun foam when making shaker cards. The fun foam makes it so much easier! Thanks for stopping by to see what I have been up to and don't forget to comment for your chance to win one of two $20 store credit to Unity Stamp! If you like what you see, please click the Instagram icon on my blog and follow me on Instagram to see what I else I come up with! See you all tomorrow! Happy Crating Y'all! |
Follow Sammi:AuthorI love to create and invite you to join me in my journey in this crazy paper crafting world we live in! Archives
February 2022
Categories |


 RSS Feed
